
This article is going to explore 63 most used and common commands in Linux. This article does not try to cover everything about the commands and Linux in general. What it does is focus on the commands core usage which could be handy while working in Linux.
What is Linux?
Linux itself is a “Kernel” which is used in operating systems like Ubuntu, Debian, Manjaro, Arch, Mint and many more. It is open source and contributors from around the world contribute to it. Android uses a modified version of Linux kernel.
What is shell?
Linux shell is a command interpreter that takes text as command and provide an output of the command to the user. It exposes the underlying operating system modules. It allows to provide advanced features compare to a GUI program.
There are different type of shells providing almost the same features, popular ones are: Bash, Zsh, Fish etc.
Hint: You can ctrl + F to search for a specific command.
1. man
man stands for manual pages for Linux. To explore a command further, I would like to check it’s man pages. For example man ls. Bear in mind that man provides too much information.
If you want simplicity try tldr.sh. On Arch/Manjaro, install it by running sudo pacman -S tealdeer and then tldr --update. Tealdeer is a Rust based CLI client for tldr.
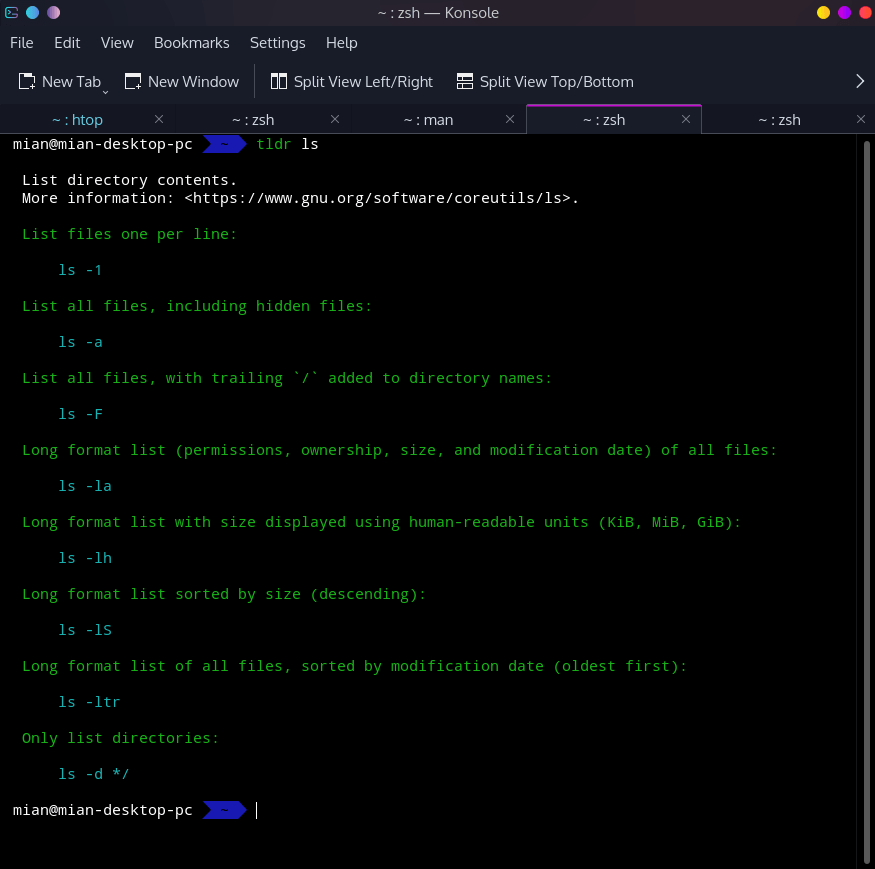
2. ls
ls stands for listing contents. In your current directory typing ls will list all the files and folders inside it. There are many flags which can be combined to achieve different results.
My favorite is ls -lha, this also prints useful information like:
- Permissions
- Number of links to that file
- Owner of the file
- Group of the file
- Size of the file in human readable format
- Last modified date and time
- Filename
a lists hidden files and directories while h prints size of the file in human readable format(KiB, MiB, GiB). l creates the data set.
3. cd
cd stands for change directory, which allows you to change directory back and forth.
cd /etc/httpd/confYou can go back to the previous directory via:
cd ..You can also do from a different directory inside /etc/alsa:
cd ../httpd4. pwd
pwd stands for print working directory and in other terms current working directory. Typing pwd will show you where you are.
5. piping
piping is represented by |. Piping allows us to combine different commands. For example, cat Readme.md | less.
ls | sort -rPiping is handy when you are looking for something specific in a file.
less index.html | grep -n footer6. clear
clear command clear all the commands ran in that terminal window/tab.
7. du
du stands for disk usage and it is one of the command I use most of the time. By default typing du in any directory will show you the size of files and directories in bytes recursively.
du /etcAdding -sh to it will print the total size of that directory in human readable format.
du -sh /etcRemoving s will print all the files and directories size recursively in human readable format.
du -h /etcYou can also sort the content by size using sort and piping.
du -h /etc | sort -hrh is added to compare human readable numbers(2K, 2M, 1G).
8. df
df stands for disk filesystem and it shows disk usage. The most popular and common flag used with df is -h.
df -h9. whoami
whoami is a simple command which shows you who are you.
10. history
history is a useful command to show all the previous commands. It does show a number in front of it, which means you can run a specific command by number.
If you have a command ls -la at line number 12.
!12You can clear the current session history by:
history -cTo permanently clear the history:
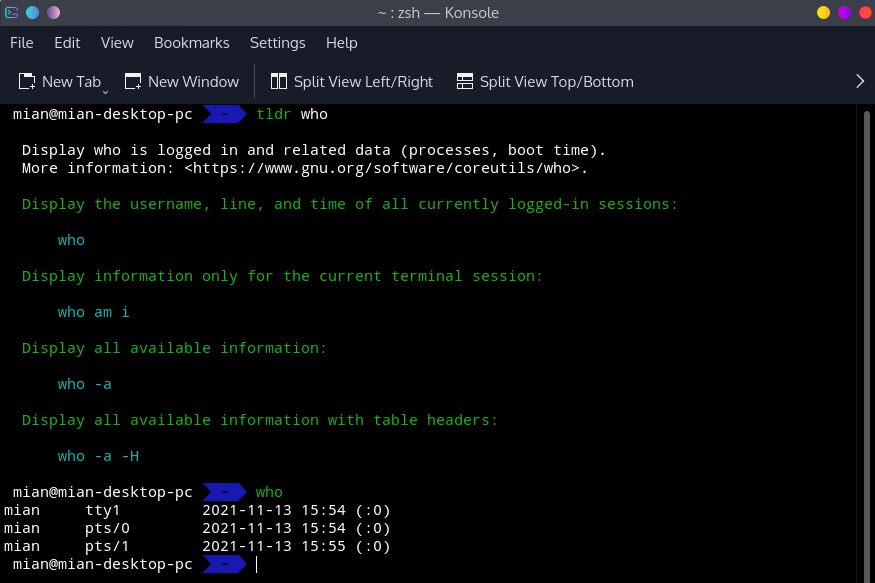
cat /dev/null > ~/.bash_history11. who
who command shows you the users logged in to the system.
12. which
which will show the full path to the executable. It only works with executable not aliases.
13. nohup
nohup is a useful command. If you want to run a long processing command on a remote system or server. It could be used to avoid network interruptions.
nohup <command>14. head
head command prints the 1st 10 lines from a file. You can add a number flag to print any number of lines.
head -n 20 Readme.md15. tail
tail displays the last 10 lines from a file. As like head you can add a flag to print any number of lines.
tail -n 20 Readme.mdThere is another option which makes tail a very useful command, that is -f. It keeps updating the entries from the file in real time.
tail -f /var/log/apache/access.logCheck it’s other useful options via man tail or tldr tail.
16. more
more is like a pagination in terminal. If you have a big file and you want to print text one screen at a time, more can just do that and plus it does allow to search within the text.
tldr moremore Readme.md<Space> tab from the keyboard jumps to the next screen/page, /something lets you search for a keyword.
Start from a specific line by adding line number.
more +5 Readme.md17. less
less is almost like more command. You can also start searching backward with ?something just like more.
18. uname
uname lists OS arch, Linux kernel, versions etc. Adding -a to it will list all the available information.
uname -aTo print the kernel version only, in Manjaro/Arch it takes -r flag to show kernel version, but it could be -v in others.
uname -rTo check all the available flags man uname.
19. date
date command can be used to display or set a date. date can convert date to any specific format you want it to be.
To set your system date and time. e.g: change it to 20211118 02:15 PM.
date --set="20211118 02:15"To know what day it was 1 year ago:
date --date="1 year ago"--date takes many options, e.g: “1 year ago”, “4 day”, “tomorrow”, “yesterday”.
Example of formatted date:
date "+DATE: %D"Different formats which date can show:
%D– Display date as mm/dd/yy%Y– Year (e.g., 2020)%m– Month (01-12)%B– Long month name (e.g., October)%b– Short month name (e.g., Oct)%d– Day of month (e.g., 01)%j– Long day of year (001-366)%u– Day of week (1-7)%A– Full weekday name (e.g., Friday)%a– Short weekday name (e.g., Fri)%H– Hour (00-23)%I– Hour (01-12)%M– Minute (00-59)%S– Second (00-60)
20. whereis
whereis command goes extra to show more information like source, and manual page files for a command compare to which.
whereis ssh21. touch
touch command let’s you create an empty file.
touch file.md22. top
top shows you your system processes in real time. top by default shows entries by CPU usage, you can change that by adding -o option.
top -o %MEM23. echo
echo as it’s name suggest prints anything passed to it.
echo "Foo Bar"This will print Foo Bar in the terminal window.
The output can also be piped to a file instead of just printing it out.
echo "Foo Bar" >> output.txtYou can also add env variables to the output. Just like ls it can also print the current directory listings with echo *.
The best part is you can add commands to it and pipe the output to a file.
echo "$(date)" >> output.txtYou can do many things with echo, checkout it’s man page.
24. mkdir
mkdir creates directories including nested ones(with -p flag).
Single directory
mkdir project1Multiple directories
mkdir project1 project2Nested directories
mkdir -p project1/src25. rmdir
rmdir is used to remove empty directories. Anything inside it, you have to use rm with -r flag.
26. rm
rm is used to remove directories and files recursively.
NOTE: Be very careful when using rm command, the damage it may have cannot be undone unless you have a BEST data lost tool or have expertise to recover them.
rm -r project1You can add -f flag to forcefully remove a directory and it’s content without prompt and error messages.
rm -rf project1You can also use rm in interactive mode with -i.
rm -i project1/style.css27. mv
mv is short for move and is used to move around files and directories.
mv file1.txt file1_bak.txtYou can move multiples files to a new location(directory).
mv file1.txt file2.txt new_locationTo move directory contents to another location:
mv project1/* project2/28. cp
cp copies files and directories.
cp file1.txt file1_bak.txtYou can also copy directories and contents with -r flag.
cp -r current_directory new_directory29. ps
ps displays information about running processes. The most common flag used with ps is aux.
ps auxLet’s say I want to look for vnstat.
ps aux | grep vnstat30. kill
kill as it’s name suggest is to kill/terminate a process. It’s not the only thing kill can do, but it is used mainly to terminate a process.
kill <PID>You can list all the signals kill can send via kill -l.
kill -1 <PID>You can get PID by pidof firefox or top.
31. killall
killall will send a signal to multiple process.
killall firefoxThis will send signal to all processes related to Firefox.
32. passwd
passwd is used to change password of users in Linux system. With typing just passwd, will ask you to change your password. To change a user password, use below command.
passwd <USERNAME>33. tracepath
tracepath in simple words is used to trace a route to your end host. e.g: you want to reach point D from A. Go to B 1st then C and lastly D which is your final destination.
tracepath will reach your home router, then your ISP and at the end, the host.
tracepath google.com34. ping
ping command is used to ping a host on the Internet or on local network to get a status.
ping google.comTo limit the count use -c flag.
ping -c 5 google.comYou can also have a bell sound when a packet is received if your terminal supports it.
ping -c 5 -a google.com35. cat
cat in it’s simplest usage prints contents to an output. cat can both print and write to files.
cat file.txtYou can pipe multiple files content to a single file. Using >> will append the content.
cat file.txt file2.txt >> new_file.txtThe useful flag is -n for large files where you would like to see line numbers.
cat -n file.txtcat is a very useful command, check it’s usage from man pages man cat or tldr cat.
36. find
find command is used to find files and directories recursively.
Some common flags are:
-namename of the file/directory/search pattern-inamefor case-insensitive names-typefor type of resource, could bed(directory),f(file),l(symbolic link)-execto execute a command- –
mtimeto pass date and time -notexclude a path combine with-path-sizefor size of the files
Search for files in a path ending .py.
find . -type f -name "*.py"To look for a directory only:
find . -type d -name assetsYou can search in multiple directories including multiple destinations:
find project1 project2 -type d -name public -or -name src or -name assetsExclude a path:
find . -type f -name '*.html' -not -path 'dist/*'Search for a file modified yesterday:
find . -type f -mtime -1Search for a file with size limits(bigger than 1KB and smaller than 5MB):
find . -type f -size +1k -size -5MAnother common usage is to find files older than a specific time period and then delete them.
This will delete files older than 15 days.
Using -exec flag:
find . -type f -mtime +15 -exec rm -f '{}' +;Using -delete flag:
find . -type f -mtime +15 -delete37. grep
grep stands for global regular expression print. You can use it to search in files or pipe it with another command for output. -i for case-insensitive.
grep -ni account Servers.mdYou can add blank lines to your each output to make it clear in reading with -C flag.
grep -niC 1 account Servers.mdSearch in all files recursively for account keyword:
grep -rni account /path/to/directoryUsing it with another command:
less Servers.md | grep -ni account38. chown
chown stands for change owner. Every file in Linux and Unix has a owner. The owner of the file, directory has full permissions on it.
chown www-data index.htmlYou can add group too with owner chown <owner>:<group> file/dir:
chown www-data:www-data index.htmlBy adding -R flag you can own files and directories recursively.
chown -R www-data:www-data project1/39. chgrp
With chown you can change group too, but to just change group of a file or directory, you can use chgrp.
chgrp www-data index.html40. chmod
chmod stands for change mode. Like chown and others, every Linux file and directory has read, write and execute permissions. This site explains the permissions in the best way possible.
To view a detailed set of information about files and directories:
ls -laThe part with drwxr-xr-x are your permissions for each file or directory. 1st character d is for directory, - is for a file and l is for a symlink.
The next three characters represents owner, the subsequent ones are for group and the last three is for everyone else.
I personally use the numeric set of arguments to change permissions. But you can use symbolic(a, u, g o) too.
chmod 750 project1To recursively change permissions of all files or folders I like to use find command.
Files
find . -type f -exec chmod 640 {} \;Folders
find . -type d -exec chmod 750 {} \;You can also use -r flag to change permissions recursively.
chmod 750 -r project141. crontab
crontab is used for scheduling jobs at a specific interval in Linux.
List your cron jobs
crontab -lTo edit or add new one
crontab -eTo run crontab as a different user e.g: www-data
crontab -e -u www-dataThe main ingredient of cron jobs are the scheduler part at the start. * represents every. To create a cron job, check out this website.
42. gzip
gzip compress files with LZ77 compression.
gzip -k Readme.mdThe same can also be achieved with:
gzip -c Readme.md > Readme.md.gzHere -k flag tells gzip to keep the original file intact, while -c do the same with outputting it as stream. If you just run gzip Readme.md, it will delete the original file.
You can also compress multiple files in a directory by using -r flag.
gzip -r project1gzip uses compression level 6 as default, you can change that though -1(fastest[worst]) to -9(slowest[best]).
gzip -8 -k Readme.mdgzip can also decompress files by adding –d flag, which is equivalent to gunzip.
43. gunzip
gunzip is used to decompress files, here the -d flag is always on.
gunzip -k Readme.md.gzYou can also list the files of a compressed archive without decompressing it.
gunzip -l Readme.md.gz44. tar
tar is one of the most used archiving utility used in GNU/Linux world. tar is derived from tape archive words.
tar cf project1.tar project1/1.html project1/404.htmlThat’s the most common usage of tar utility. -c is to create, -f to write to file the archive. You can also compress the archive with -a.
tar caf project1.tar.xz project1/1.html project1/404.htmlAlso used commonly to gzip files using -z. This is similar to using gzip.
tar czf project1.tar.gz project1/1.html project1/404.htmlTo extract files from an archive, -x flag is used(derived from extract).
tar xf project1.tarYou can also specify where to extract the files with -C.
tar xf project1.tar -C project2List the files of a tar file.
tar tvf project1.tar–v stands for verbose.
45. printenv
printenv has one job that is to print the environment(env) variables. You can also use env to pass env variables to apps and utilities. man env or tldr env
printenv46. diff
diff as it’s name suggest stands for difference. If you are familiar with Git, you then may see the diff everyday in your terminal but with a flag which Git prefer(-u).
In general diff is very useful tool for users who works with files most of the time.
diff file1.txt file2.txtThat’s the simplest form of diff with very minimal output, this could be extended with -y to better see the difference.
diff -y file1.txt file2.txtTo make it more clear and colorful, we can use -u(unified) flag. This is used by Git as mentioned.
diff -u file1.txt file2.txt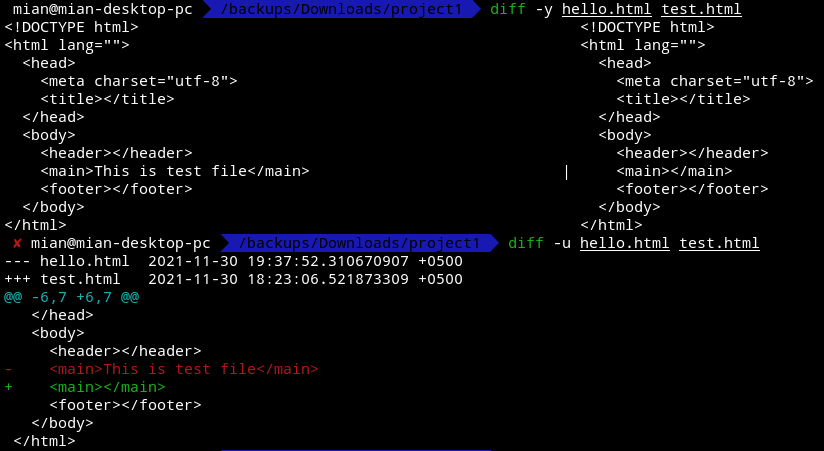
By adding -r flag you can lookup in directories recursively.
If you want to only list the files which differ instead add -q flag stands for brief.
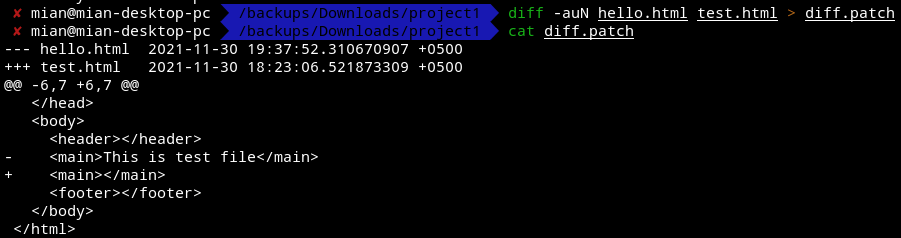
Wondering how to create a Git style diff patch file. You can easily create one with diff.
diff -auN hello.html test.html > diff.patch-u = unified, -a = treat all files as text, -N = new file
47. wc
wc stands for word count and is used for counting lines, words, and bytes.
wc hello.htmlOutput will be
12 18 203 hello.htmlThis defaults to use -l(lines), -w(words), -c(bytes) flags.
You can also use wc with pipes.
find . | wc48. sort
sort is used to sort content of files.
sort hello.htmlTo reverse the order, use -r option.
sort -r hello.htmlYou can remove duplicate words with -u. sort can be used with pipes as many commands do.
ls -la | sort -r49. uniq
uniq works well with sort as explained in man pages:
uniq output the unique lines from the given input or file.
Since it does not detect repeated lines unless they are adjacent, we need to sort them first.
sort -r hello.html | uniqBy default it will show the unique lines, but adding -d will only show duplicates.
sort -r hello.html | uniq -dAnother useful flag is -c for number of occurrences of each line.
You can add another sort pipe to sort the lines by occurrences.
sort hello.html | uniq -c | sort -nr50. jobs
jobs is used for viewing information about processes spawned by the current shell.
jobs -lBy fg we can get back to that background process. If there are more jobs, you need to pass the job ID to fg, fg 1.
51. bg
bg let you run a suspended command in the background. For example running top means it will occupy the current shell, suspend it with ctrl+z and then run bg. jobs -l will list the commands.
52. fg
fg simply will bring the command output to the screen which is either started with bg or &*.
*You start a command in the background with &, top &.
53. ln
ln creates links(symlinks) to files and directories. There are two types, hard and soft. Soft links are common and widely used compare to hard links. Format is ln -s orginal symlink.
ln -s hello.html hello-symlink.htmlls -la will indicate that hello-symlink.html is pointed to hello.html.
If you remove -s flag, it will create a hard link.
54. type
type display the type of command the shell will execute.
type ls
ls is an alias for ls --color=tty
type cat
cat is /usr/bin/cat
55. alias
alias is a useful utility to use in GNU/Linux systems. It basically shorten the command you want to run and make it simple.
alias project1="cd /var/www/html/project1"Typing project1 in terminal will automatically change directory to /var/www/html/project1.
To create a permanent alias, add it to either ~/.zshrc or ~/.bashrc depends on your shell and operating system.
Make it available without login/restart.
source ~/.zshrc56. su
su is an acronym for superuser. By just entering su in terminal will log you in as root.
You can switch to another user space by adding username.
su anotheruserYou can exit current user shell by exit command.
57. sudo
sudo stands for superuser do. sudo is used to run command as root, for that user must be in sudoers list.
An example is Ubuntu operating system where user can run root commands by adding sudo to the command.
sudo vim /etc/apache2/sites-available/000-default.confsudo is flexible and you can run it as another user with -u flag.
sudo -u anotheruser vim /project2/test.mdYou can also run the last executed command by sudo.
sudo !!To know what commands you can run with:
sudo --list58. vim
vim or vi is a file editor used by many users to edit system files mostly in terminal.
It is basically vi, then it was improved which became vim(vi improved). Simplest use case is to add filename in front of it.
vim test.mdTo start writing in the file, you will need to press i key or Ins key from your keyboard. The mode will be switched to insert mode in the left bottom of the screen. To quit insert mode, press Esc key.
To just save the file type and press enter:
:wNote: you can also save and exit with holding shift and pressing z key twice.
Save and exit:
:wqExit without save:
:q!Open a file at a specified line number:
vim +5 test.mdTo undo the last operation type u.
To search inside a file:
/<search_word>Press enter and then press N from the keyboard to go next matching word/character.
vim is powerful and if you are a developer you can give it try. For more keys and commands inside vim checkout it’s man page. man vim or tldr vim.
59. nano
nano is the easiest editor to use. If your system does not ship vim, nano is always there.
nano test.mdYou will see the controls at the bottom, most of them can be used with using ctrl key. To save hold ctrl and press O, it will ask for filename confirmation press enter. To exit hold ctrl and press X.
You can do same with nano too to go to any specific line number:
nano +5 test.md60. export
export man page defines it this way, “Command to mark shell variables in the current environment to be exported with any newly forked child processes”.
export VAR=testingAfter exporting it VAR is now available in the current env for you to use in your scripts.
61. basename
basename returns the last segment from a path. As a programmer you may have seen this command where you extract the last word from a let’s say URL.
basename /project1/test.htmlThis will return test.html.
62. dirname
dirname returns the directory name from a given path. The following command will return /project1.
dirname /project1/test.html63. umask
umask is to manage masking permissions. By default on Linux systems when you create a file it will have 0022(022) or 0002(002) permissions.
Typing umask with -S will print symbolic values where u means user(owner), g stands for group and o is for others. rwx = read, write, execute
You can set umask with either symbolic or octal values.
Octal values differ from chmod values.
0 : read, write and execute
1 : read and write
2 : read and execute
3 : read only
4 : write and execute
5 : write only
6 : execute only
7 : no permissions
I hope I have covered most of the commands you can use on daily basis to get your work done.


