
Nextcloud 27, just like Nextcloud 26, is heavily reliant on AI, and the feature set is primarily driven by AI itself. In this article, I will guide you through the step-by-step process of how to install Nextcloud 27 (Hub 5) on an Ubuntu server (22.04 LTS).
Want to upgrade to Nextcloud 27 (Hub 5)? Click here
Looking to install Nextcloud 28 Hub 7? Click here
The server size and specifications depend on your specific needs. However, here are the basic specifications to help you get started.
- Ubuntu 22.04 LTS
- 1GB RAM
- 20GB HDD space
- 1 CPU core
- Public IP – ipv4
Don’t forget to point your server IP to the domain of your choice.
1- Prepare the system
Update your system and remove unnecessary packages.
apt update && apt upgrade

apt autoremove && apt autoclean
Enable the firewall and allow only specific ports.
ufw default allow outgoing
ufw default deny incoming
ufw allow 22
ufw allow 80
ufw allow 443
ufw enable
ufw status
Port 22 is for SSH access to the server; change it if you have modified this on the server.
Now, we will proceed to install the LAMP stack.
apt install apache2 mariadb-server libapache2-mod-php php php-gmp php-bcmath php-gd php-json php-mysql php-curl php-mbstring php-intl php-imagick php-xml php-zip php-fpm php-redis php-apcu php-opcache php-ldap bzip2 zip unzip imagemagick vim ffmpeg redis-serverAfter the installation has completed, enable PHP 8.1 FPM and its Apache configuration.
a2enconf php8.1-fpm
a2dismod php8.1
a2dismod mpm_prefork
a2enmod mpm_event
We will also enable some Apache modules.
a2enmod ssl rewrite headers proxy proxy_http deflate cache proxy_wstunnel http2 proxy_fcgi env expiressystemctl restart apache2Ensure that Apache, PHP FPM, and MariaDB services are set to start automatically at boot.
systemctl enable apache2
systemctl enable php8.1-fpm
systemctl enable mariadb
2- Database
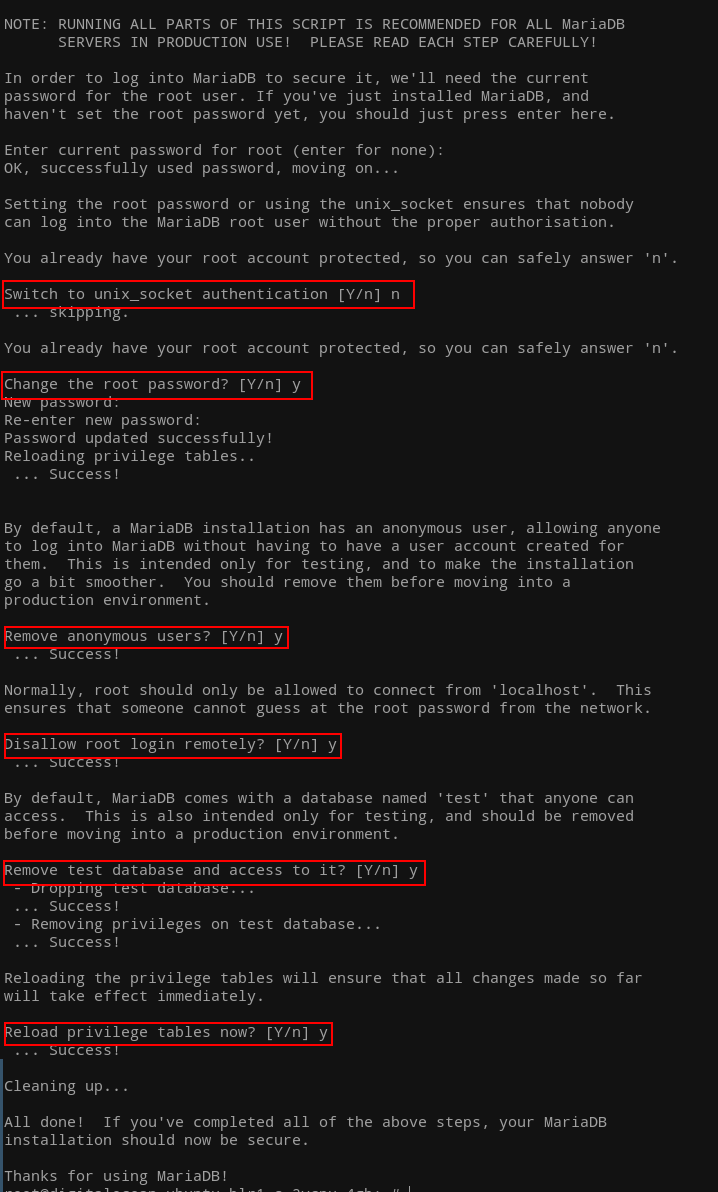
Most systems come pre-installed with mysql_secure_installation. Let’s run it to perform the initial setup.
Now, log in to the database server and create the nextcloud database. Please remember to replace PASSWORD in the command below.
mysql

create database nextcloud CHARACTER SET utf8mb4 COLLATE utf8mb4_general_ci;

grant all on nextcloud.* to 'ncuser'@'localhost' identified by 'PASSWORD';

flush privileges;
exit
3- PHP configuration updates
Since we are utilizing PHP FPM, it becomes necessary to modify the PHP FPM configuration file.
vim /etc/php/8.1/fpm/php.iniCheck PHP timezone manual for your timezone.
You have the flexibility to adjust the post_max_size and upload_max_filesize based on your specific requirements. In this case, I have set it to 200MB.
* Please note that the line numbers provided are for informational purposes only.
output_buffering = off (line 226)
max_execution_time = 180 (line 409)
memory_limit = 512M (line 430)
post_max_size = 200M (line 698)
upload_max_filesize = 200M (line 850)
date.timezone = Europe/Berlin (line 968)

opcache.enable=1 (line 1767)
opcache.enable_cli=1 (line 1770)
opcache.memory_consumption=512 (line 1773)
opcache.interned_strings_buffer=96 (line 1776)
opcache.max_accelerated_files=10000 (line 1780)
opcache.revalidate_freq=1 (line 1798)
opcache.save_comments=1 (line 1805)
Restart PHP FPM after applying the changes.
systemctl restart php8.1-fpm4- Download Nextcloud
Navigate to the www directory to continue.
cd /var/www
wget https://download.nextcloud.com/server/releases/nextcloud-27.0.1.zip
Extract and relocate it to the root directory of your web server.
unzip nextcloud-27.0.1.zip
rm -r /var/www/html/*
shopt -s dotglob
mv nextcloud/* html/
Modify the ownership and group of the web server root directory.
chown -R www-data:www-data /var/www/html5- Apache virtual host and SSL
Generate a nextcloud.conf configuration file in the Apache sites-available directory.
cd /etc/apache2/sites-available/
vim nextcloud.conf
Copy and paste the following content into the configuration file.
<VirtualHost *:80>
	ServerName DOMAIN.COM
	ServerAlias DOMAIN.COM
	DocumentRoot /var/www/html

	<Directory "/var/www/html">
		AllowOverride All
		Options -Indexes +FollowSymLinks
	</Directory>

	ErrorLog /var/log/apache2/nextcloud_error.log
</VirtualHost>
Activate the newly created configuration and restart the Apache server.
a2dissite 000-default.conf
a2ensite nextcloud.conf

apachectl -t
systemctl restart apache2
At this point, I assume you have already pointed your server IP to the domain. We will obtain a free certificate from Let’s Encrypt using certbot. If you already have your own certificates, you may skip the SSL setup.
snap install certbot --classic
certbot certonly --webroot -w /var/www/html -d DOAMIN.COMNext, we will proceed to update the Apache configuration file for Nextcloud located at /etc/apache2/sites-available/nextcloud.conf.
<VirtualHost *:443>
	ServerName DOMAIN.COM
	DocumentRoot /var/www/html

	SSLCipherSuite EECDH+AESGCM:EDH+AESGCM:AES256+EECDH:ECDHE-RSA-AES128-SHA:DHE-RSA-AES128-GCM-SHA256:AES256+EDH:ECDHE-RSA-AES256-GCM-SHA384:ECDHE-RSA-AES128-GCM-SHA256:DHE-RSA-AES256-GCM-SHA384:ECDHE-RSA-AES256-SHA384:ECDHE-RSA-AES128-SHA256:ECDHE-RSA-AES256-SHA:DHE-RSA-AES256-SHA256:DHE-RSA-AES128-SHA256:DHE-RSA-AES256-SHA:DHE-RSA-AES128-SHA:ECDHE-RSA-DES-CBC3-SHA:EDH-RSA-DES-CBC3-SHA:AES256-GCM-SHA384:AES128-GCM-SHA256:AES256-SHA256:AES128-SHA256:AES256-SHA:AES128-SHA:DES-CBC3-SHA:HIGH:!aNULL:!eNULL:!EXPORT:!DES:!MD5:!PSK:!RC4
	SSLProtocol All -SSLv2 -SSLv3 -TLSv1 -TLSv1.1
	SSLHonorCipherOrder On
	Header always set Strict-Transport-Security "max-age=63072000; includeSubDomains; preload"
	Header always set X-Frame-Options DENY
	Header always set X-Content-Type-Options nosniff

	Protocols h2 http/1.1

	<Directory "/var/www/html">
		AllowOverride All
		Options -Indexes +FollowSymLinks
	</Directory>

	<FilesMatch ".(ico|pdf|flv|jpg|jpeg|png|gif|js|css|swf|ttf|woff)$">
		Header set Cache-Control "max-age=31536000, public"
	</FilesMatch>

	ErrorLog /var/log/apache2/nextcloud_error.log

	SSLEngine on
	SSLCertificateKeyFile /etc/letsencrypt/live/DOMAIN.COM/privkey.pem
	SSLCertificateFile /etc/letsencrypt/live/DOMAIN.COM/fullchain.pem
</VirtualHost>
Save, test and restart Apache.
apachectl -t
systemctl restart apache2
Redirect to HTTPS automatically by adding the following to the port 80 block. Don’t forget to restart Apache for the changes to take effect.
RewriteEngine On
RewriteCond %{HTTPS} off
RewriteRule (.*) https://%{HTTP_HOST}%{REQUEST_URI}
Now, open a new browser tab and enter the URL. This will take you to the installation screen, where you can provide the necessary admin credentials, database access credentials, and other required information.
After completing the installation, you may want to explore additional improvements such as utilizing a system cron job, relocating the data directory outside of the web directory, enabling cache, and more. For detailed instructions, refer to the Hacks and Improvements article.


