
I have a Raspberry Pi 3 Model B lying around, and I thought, why not take it for a spin and make use of it? I installed Raspberry OS (Debian 12 – Bookworm) on it via the Raspberry Pi Imager on an SSD drive, booted it, and now it’s time to make it functional as a working cloud storage. Read on to learn how to install Nextcloud on your Raspberry Pi 3/4/5.
In most (almost all) situations, your Raspberry Pi will be at your home or office. To access it outside your network, you may use a static IP from your ISP and forward ports like 80 and 443 to the Raspberry machine on your router. You can see your public IP by typing into a Google search, ‘What is my IP‘. If you have a dynamic IP from your ISP, you can follow this article to set it up with Cloudflare.
Notes
- If you have installed Raspberry OS (Debian 11 – Bullseye), follow step 1 to add the suryphp repository for the latest PHP.
- If you already have Raspberry OS (Debian 12 – Bookworm), skip step 1 and start from step 2.
The first thing we will do is update the Pi.
apt update && apt upgrade1- PHP repository (Debian 11 and older only)
We will install PHP 8.2 to avoid upgrades in the near future. For this, we will add the suryphp repository.
apt install lsb-release curl

curl https://packages.sury.org/php/apt.gpg | sudo tee /usr/share/keyrings/suryphp-archive-keyring.gpg >/dev/null

echo "deb [signed-by=/usr/share/keyrings/suryphp-archive-keyring.gpg] https://packages.sury.org/php/ $(lsb_release -cs) main" | sudo tee /etc/apt/sources.list.d/sury-php.list

apt update
2- Install LAMP stack
It’s time to install PHP, Apache, and MariaDB now.
apt install apache2 mariadb-server libapache2-mod-php8.2 php8.2 php8.2-gmp php8.2-bcmath php8.2-gd php8.2-mysql php8.2-curl php8.2-mbstring php8.2-intl php8.2-imagick php8.2-xml php8.2-zip php8.2-fpm php8.2-redis php8.2-apcu php8.2-opcache php8.2-ldap php8.2-imap php8.2-bz2 bzip2 zip unzip imagemagick vim ffmpeg redis-serverWe will use PHP-FPM; let’s enable it.
a2enconf php8.2-fpm
a2dismod php8.2
a2dismod mpm_prefork
a2enmod mpm_event
Activate specific Apache modules.
a2enmod ssl rewrite headers proxy proxy_http deflate cache proxy_wstunnel http2 proxy_fcgi env expiressystemctl restart apache2Enable Apache, MariaDB and PHP-FPM during startup.
systemctl enable apache2
systemctl enable php8.2-fpm
systemctl enable mariadb
We are finished here; let’s proceed to the database creation step.
3- Create database
In this section, we will create a database for Nextcloud along with a user and password.
Run the following command to set the root password, and remove the test database, etc.
mysql_secure_installation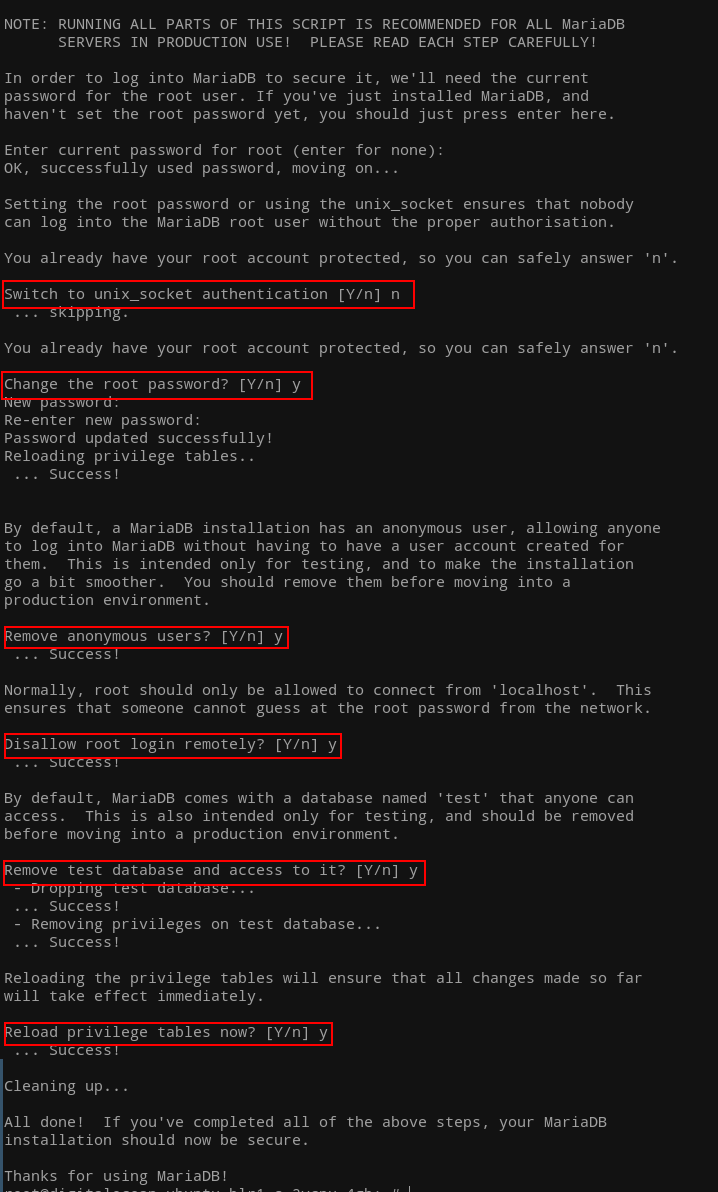
Run the following commands to create nextcloud database. Change PASSWORD to a strong password. ncuser is the database user.
mysql

create database nextcloud CHARACTER SET utf8mb4 COLLATE utf8mb4_general_ci;

grant all on nextcloud.* to 'ncuser'@'localhost' identified by 'PASSWORD';

flush privileges;
exit
4- Configure PHP
We will now configure PHP to meet some of the Nextcloud requirements. Since we are using PHP-FPM and PHP 8.2, the file we need to modify is in /etc/php/8.2/fpm/.
vim /etc/php/8.2/fpm/php.iniI have included the line numbers for your convenience to easily locate the specific options.
output_buffering = off (line 226)
max_execution_time = 180 (line 409)
memory_limit = 512M (line 435)
post_max_size = 250M (line 703)
upload_max_filesize = 250M (line 855)
date.timezone = Europe/Berlin (line 979)

opcache.enable=1 (line 1789)
opcache.enable_cli=1 (line 1792)
opcache.memory_consumption=512 (line 1795)
opcache.interned_strings_buffer=96 (line 1798)
opcache.max_accelerated_files=10000 (line 1802)
opcache.revalidate_freq=2 (line 1820)
opcache.save_comments=1 (line 1827)
Save this configuration and restart PHP-FPM.
systemctl restart php8.2-fpm5- Download Nextcloud
We will now download the latest stable release of Nextcloud.
cd /var/www

wget https://download.nextcloud.com/server/releases/latest.zip
Unzip the downloaded archive and move it to the web root directory.
unzip latest.zip
rm -r /var/www/html/*
shopt -s dotglob
mv nextcloud/* html/

mkdir /var/www/data
Remove the archive and directory.
rm -r nextcloud
rm latest.zip
Change the ownership of html and data directory.
chown -R www-data:www-data /var/www/html
chown -R www-data:www-data /var/www/data
6- Apache virtual host
In this section, we will now create a virtual host file for Nextcloud. You can name the filename anything; I will name it ‘nextcloud.conf‘.
cd /etc/apache2/sites-available
vim nextcloud.conf
Please copy and paste the following into it and change the ServerName to your IP or domain.
<VirtualHost *:80>
	ServerName DOMAIN

	DocumentRoot /var/www/html

	<Directory "/var/www/html">
		AllowOverride All
		Options -Indexes +FollowSymLinks
	</Directory>

	ErrorLog /var/log/apache2/nextcloud_error.log
</VirtualHost>
We will now enable this configuration and disable the default configuration.
a2dissite 000-default.conf
a2ensite nextcloud.conf

apachectl -t
systemctl restart apache2
7- SSL certificate via Let’s Encrypt
If you have your own certificates from another provider, please skip this step.
To get certificates for your domain, make sure you have pointed your domain to your IP and used the domain name in the nextcloud.conf file. Change the domain name to your actual domain.
apt install certbot
certbot certonly --webroot -w /var/www/html -d DOAMIN.COM
After successfully getting the certificate, note down the paths to it.
8- Update virtual host
Right now, you can access Nextcloud without HTTPS, but if you have the certificate at hand, why not just use it. For this, we will update our virtual host file with a new section for port 443.
Change the domain name and paths to your certificate accordingly.
<VirtualHost *:443>
	ServerName DOMAIN.COM
	DocumentRoot /var/www/html

	SSLCipherSuite EECDH+AESGCM:EDH+AESGCM:AES256+EECDH:ECDHE-RSA-AES128-SHA:DHE-RSA-AES128-GCM-SHA256:AES256+EDH:ECDHE-RSA-AES256-GCM-SHA384:ECDHE-RSA-AES128-GCM-SHA256:DHE-RSA-AES256-GCM-SHA384:ECDHE-RSA-AES256-SHA384:ECDHE-RSA-AES128-SHA256:ECDHE-RSA-AES256-SHA:DHE-RSA-AES256-SHA256:DHE-RSA-AES128-SHA256:DHE-RSA-AES256-SHA:DHE-RSA-AES128-SHA:ECDHE-RSA-DES-CBC3-SHA:EDH-RSA-DES-CBC3-SHA:AES256-GCM-SHA384:AES128-GCM-SHA256:AES256-SHA256:AES128-SHA256:AES256-SHA:AES128-SHA:DES-CBC3-SHA:HIGH:!aNULL:!eNULL:!EXPORT:!DES:!MD5:!PSK:!RC4
	SSLProtocol All -SSLv2 -SSLv3 -TLSv1 -TLSv1.1
	SSLHonorCipherOrder On
	Header always set Strict-Transport-Security "max-age=63072000; includeSubDomains; preload"
	Header always set X-Frame-Options DENY
	Header always set X-Content-Type-Options nosniff

	Protocols h2 http/1.1

	<Directory "/var/www/html">
		AllowOverride All
		Options -Indexes +FollowSymLinks
	</Directory>

	<FilesMatch ".(ico|pdf|flv|jpg|jpeg|png|gif|js|css|swf|ttf|woff)$">
		Header set Cache-Control "max-age=31536000, public"
	</FilesMatch>

	ErrorLog /var/log/apache2/nextcloud_error.log

	SSLEngine on
	SSLCertificateKeyFile /etc/letsencrypt/live/DOMAIN.COM/privkey.pem
	SSLCertificateFile /etc/letsencrypt/live/DOMAIN.COM/fullchain.pem
</VirtualHost>
Check this new configuration and restart Apache.
apachectl -t
systemctl restart apache2
You can now access Nextcloud with your domain name using HTTPS. It will not redirect automatically yet; for that, we can add the following to port 80.
RewriteEngine On
RewriteCond %{HTTPS} off
RewriteRule (.*) https://%{HTTP_HOST}%{REQUEST_URI}
Don’t forget to restart Apache afterward.
You are now ready to install Nextcloud. The first page you will see is to enter admin username with password, database credentials, path to data directory (/var/www/data). The next screen will ask if you would like to install the recommend apps, skip if you want to install them later. And that would be it.
You are now ready to install Nextcloud. On the first page, you will need to enter the admin username with password, database credentials, and the path to the data directory (/var/www/data). The next screen will ask if you would like to install the recommended apps; skip this step if you want to install them later. And that would be it.
Make sure to check out the Nextcloud improvements article to enhance your setup.


Works flawlessly now. Thanks bro
Installed php 8.3 and it worked, your tuto was for 8.2 🙂
Thanks a a lot!
Glad to hear you have sorted it out.
Hi, I reinstalled LAMP stack commands, theerro message is now :
No database driver is installed (sqlite, mysql, or postgresql).
The PHP libxml module is not installed.
Please ask your administrator to install the module.
PHP modules have been installed but are still reported as missing?
I run raspberry OS 64 bits on a Pi 5 and I ssh from a windows 10 PC
Hi, thanks for the fantastic tutorial, it worked when no others did!
Only problem is, when accessing the first page, I have several php error messages under the NC logo (php-zip, xml, mbstring, etc.). I manually edited the php.ini to add or comment out these modules. but the NC page remains the same. Any ideas?
I’m on a Pi 5 under the lastest raspberry OS
Thanks a lot!
Hi there, I’m glad that it helped you.
Could you please share a screenshot of the page to hello AT najigram DOT com? I will look into it.
Sure but can’t find a way to upload a pic.
Here’s an AI translation:
Error
No database driver is installed (sqlite, mysql, or postgresql).
The PHP zip module is not installed.
Kindly request your administrator to install the module.
The PHP dom module is not installed.
Please ask your administrator to install the module.
The PHP XMLWriter module is not installed.
Kindly request your administrator to install the module.
The PHP XMLReader module is not installed.
Please ask your administrator to install the module.
The PHP libxml module is not installed.
Kindly request your administrator to install the module.
The PHP mbstring module is not installed.
Please ask your administrator to install the module.
The PHP GD module is not installed.
Kindly request your administrator to install the module.
The PHP SimpleXML module is not installed.
Please ask your administrator to install the module.
The PHP cURL module is not installed.
Kindly request your administrator to install the module.
The PHP PDO module is not installed.
Please ask your administrator to install the module.
Have the PHP modules been installed but still appear as missing?
Please request your server administrator to restart the web server.
That errors most likely means the modules are not installed. Please check the installation of LAMP stack commands in the how-to above.
What OS you are on?