
Mattermost is a collaboration tool designed for teams to communicate efficiently. It have mobiles apps and they are open source which could be white labelled if needed. In this article let me guide you how to install and setup Mattermost on Ubuntu 22.04 LTS server.
Need help with white labeling or push gateway for Mattermost? Contact us
You can use any Ubuntu version, but I recommend to use latest 22.04 LTS version. We will use Apache as proxy here.
1- System update
If you have done this already, you can skip this step. If not yet, run the following commands to update the system.
apt update && apt upgrade

apt autoremove && apt autoclean
Restart the server if required.
2- Firewall
We will enable UFW firewall and only allow the ports for communication which are necessary.
ufw default allow outgoing
ufw default deny incoming
ufw allow 22
ufw allow 80
ufw allow 443
ufw enable
ufw status3- Install apps/libraries
Let’s install Apache, MariaDB, snap etc.
apt install apache2 mariadb-server snap vim curlEnable some Apache modules:
a2enmod ssl rewrite headers proxy proxy_http deflate cache proxy_wstunnel http2 proxy_fcgi env expiresStart and enable Apache and MariaDB at boot time.
systemctl start apache2
systemctl enable apache2

systemctl start mariadb
systemctl enable mariadb
4- Database setup
Run the following command to setup the database server with root password, remove test db etc.
/usr/bin/mysql_secure_installation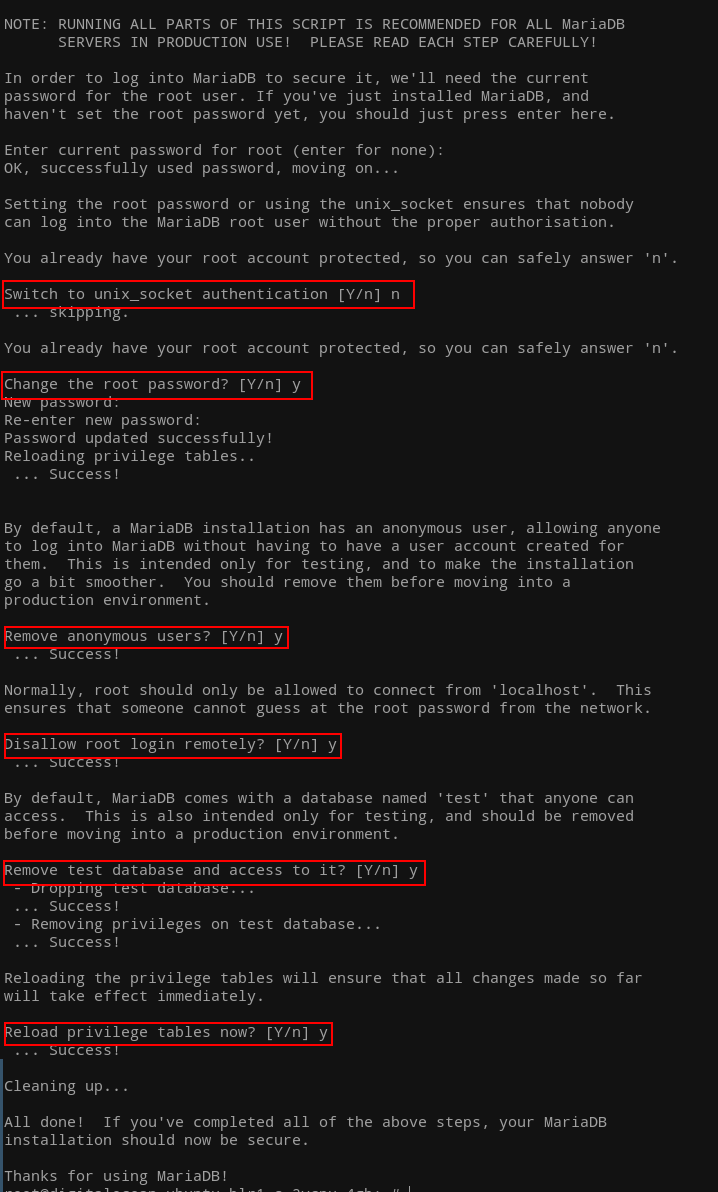
You can now login to the database server to create database for Mattermost.
mysql -u root -pCreate a database with name mattermost and user mmuser. Use a strong password to replace PASSWORD.
create database mattermost CHARACTER SET utf8mb4 COLLATE utf8mb4_general_ci;
grant all on mattermost.* to 'mmuser'@'localhost' identified by 'PASSWORD';

flush privileges;
exit
5- Apache virtual host
We will now create a Mattermost virtual host in Apache.
cd /etc/apache2/sites-available

vim mattermost.conf
Paste the following in it. Change DOMAIN.COM to your actual domain.
<VirtualHost *:80>
	ServerName DOMAIN.COM
	ServerAlias DOMAIN.COM
	DocumentRoot /var/www/html

	<Directory "/var/www/html">
		AllowOverride All
		Options -Indexes +FollowSymLinks
	</Directory>

	ErrorLog /var/log/apache2/DOMAIN.COM-error.log
</VirtualHost>
Enable this configuration and restart Apache.
a2dissite 000-default.conf
a2ensite mattermost.conf

apachectl -t
systemctl restart apache2
6- SSL
Install certbot via snap to get a free certificate from Let’s encrypt.
Note: Make sure you have pointed the domain to the server IP and is propagated.
snap install certbot --classicGet a certificate for your domain.
certbot certonly --webroot -w /var/www/html -d DOMAIN.COMNote down the paths to the certificate files once retrieved successfully.
7- Setup Mattermost
We will first download Mattermost and then extract the TAR archive.
cd ~

wget https://releases.mattermost.com/7.9.0/mattermost-7.9.0-linux-amd64.tar.gz
Check out this page for latest releases and required server spec. For example, you can change 7.9.0 to the release you want to install in the above command.
Extract the archive and move mattermost directory to /opt.
tar -xvzf mattermost*.gz

mv mattermost /opt
Create a data directory.
mkdir /opt/mattermost/dataTo run Mattermost under a different user, we will create a system user for it.
useradd --system --user-group mattermostChange mattermost directory ownership.
chown -R mattermost:mattermost /opt/mattermost
chmod -R g+w /opt/mattermost
Before we start the Mattermost server, we will make some changes to the config file.
vim /opt/mattermost/config/config.jsonChange the siteurl to your actual domain and database DataSource to (around line 138):
mmuser:PASSWORD@tcp(localhost:3306)/mattermost?charset=utf8mb4,utf8&writeTimeout=30smmuser is the database user we created above, change PASSWORD and the rest you can leave as is unless you have a different database name.
Now let’s start the server and see if everything is working.
cd /opt/mattermost

sudo -u mattermost bin/mattermost
This will start the Mattermost server and you will see bunch of logs scrolling on your screen with the Server is listening on [::]:8065 at the end.

Congratulations, Mattermost is working.
At this point, we will close the server connection to continue with our setup. Press ctrl+c to terminate it.
8- Systemd file
We will create a Systemd unit file for Mattermost to start and stop it easily.
vim /lib/systemd/system/mattermost.servicePaste the following in it.
[Unit]
Description=Mattermost
After=network.target
After=mysql.service
BindsTo=mysql.service

[Service]
Type=notify
ExecStart=/opt/mattermost/bin/mattermost
TimeoutStartSec=3600
KillMode=mixed
Restart=always
RestartSec=10
WorkingDirectory=/opt/mattermost
User=mattermost
Group=mattermost
LimitNOFILE=49152

[Install]
  WantedBy=mysql.service
Save and reload Systemd daemon.
systemctl daemon-reloadEnable and start Mattermost as Systemd unit.
systemctl enable mattermost
systemctl start mattermost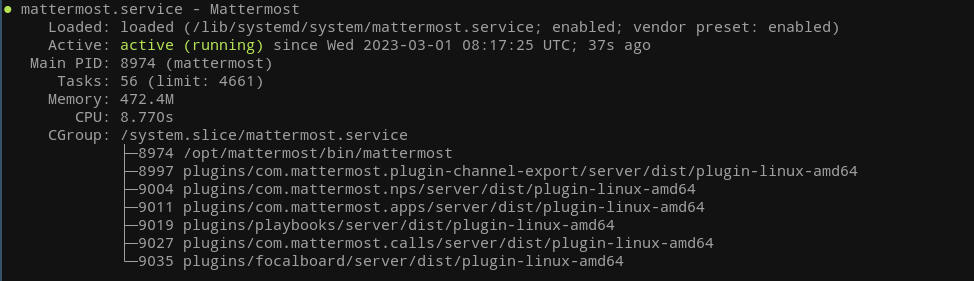
Check if Mattermost is accessible at localhost port 8065.
curl http://localhost:80659- Update Apache virtual host with SSL
We already have SSL certificates, we will now update Apache virtual host for Mattermost to listen on 443 and proxy all the requests to Mattermost server on port 8065.
vim /etc/apache2/sites-available/mattermost.confPaste the following in it and change DOMAIN.COM.
<VirtualHost *:443>
	ServerName DOMAIN.COM

	ProxyPreserveHost On
	RequestHeader set "X-Forwarded-Proto" expr=%{REQUEST_SCHEME}
	RequestHeader set "X-Forwarded-SSL" expr=%{HTTPS}

	RewriteEngine On
	RewriteCond %{REQUEST_URI} /api/v[0-9]+/(users/)?websocket [NC,OR]
	RewriteCond %{HTTP:UPGRADE} ^WebSocket$ [NC,OR]
	RewriteCond %{HTTP:CONNECTION} ^Upgrade$ [NC]
	RewriteRule .* ws://127.0.0.1:8065%{REQUEST_URI} [P,QSA,L]

	<Location />
		Require all granted
		ProxyPass http://127.0.0.1:8065/
		ProxyPassReverse http://127.0.0.1:8065/
		ProxyPassReverseCookieDomain 127.0.0.1 DOMAIN.COM
	</Location>

	SSLCipherSuite EECDH+AESGCM:EDH+AESGCM:AES256+EECDH:ECDHE-RSA-AES128-SHA:DHE-RSA-AES128-GCM-SHA256:AES256+EDH:ECDHE-RSA-AES256-GCM-SHA384:ECDHE-RSA-AES128-GCM-SHA256:DHE-RSA-AES256-GCM-SHA384:ECDHE-RSA-AES256-SHA384:ECDHE-RSA-AES128-SHA256:ECDHE-RSA-AES256-SHA:DHE-RSA-AES256-SHA256:DHE-RSA-AES128-SHA256:DHE-RSA-AES256-SHA:DHE-RSA-AES128-SHA:ECDHE-RSA-DES-CBC3-SHA:EDH-RSA-DES-CBC3-SHA:AES256-GCM-SHA384:AES128-GCM-SHA256:AES256-SHA256:AES128-SHA256:AES256-SHA:AES128-SHA:DES-CBC3-SHA:HIGH:!aNULL:!eNULL:!EXPORT:!DES:!MD5:!PSK:!RC4
	SSLProtocol All -SSLv2 -SSLv3 -TLSv1 -TLSv1.1
	SSLHonorCipherOrder On
	Header always set Strict-Transport-Security "max-age=63072000; includeSubDomains; preload"
	Header always set X-Frame-Options DENY
	Header always set X-Content-Type-Options nosniff

    Protocols h2 http/1.1

    ErrorLog /var/log/apache2/DOMAIN.COM-error.log

	SSLEngine on
	SSLCertificateKeyFile /etc/letsencrypt/live/DOMAIN.COM/privkey.pem
	SSLCertificateFile /etc/letsencrypt/live/DOMAIN.COM/fullchain.pem
</VirtualHost>
Check the configuration file and restart Apache.
apachectl -t
systemctl restart apache2
Go ahead, open the URL in the browser and start the initial setup by creating new team and account etc.
If your server is not redirecting to https yet, add the following lines to port 80 block in mattermost.conf file and restart Apache.
RewriteEngine On
RewriteCond %{HTTPS} off
RewriteRule (.*) https://%{HTTP_HOST}%{REQUEST_URI}
Happy collaborating… 🙂


