
Redmine is a powerful open-source project management and issue tracking tool. Whether you are a small team or large organization, Redmine can help your project management process allowing you to collaborate easily. In this guide, I’ll walk you through how to set up Redmine on Ubuntu 22.04 LTS alongside the Apache web server.
Requirements:
- A VPS with Ubuntu 22.04 LTS
- MySQL database
- Apache web server
- Domain name
- SSL from Let’s encrypt (optional, but should have it)
Before getting started, if you plan to use a domain name and an SSL certificate, make sure to point your domain to the server’s IP address.
1- Server setup
First, update the server and enable the firewall with only necessary ports.
apt update && apt upgrade

apt autoremove && apt autoclean
ufw default allow outgoing
ufw default deny incoming
ufw allow 22
ufw allow 80
ufw allow 443
ufw enable
ufw statusPort 22 is the SSH port.
2- Stack installation
At this step, we will install all the dependencies required to run Redmine.
apt install apache2 ruby ruby-dev build-essential libapache2-mod-passenger libmysqlclient-dev mysql-server vimEnable Apache modules:
a2enmod ssl rewrite headers proxy proxy_http deflate cache proxy_wstunnel http2 proxy_fcgi env expiresEnable Apache and MySQL services at boot.
systemctl enable apache2
systemctl enable mysql
3- Create database
Ubuntu come pre-installed with mysql_secure_installation. Let’s run it to perform the initial setup.
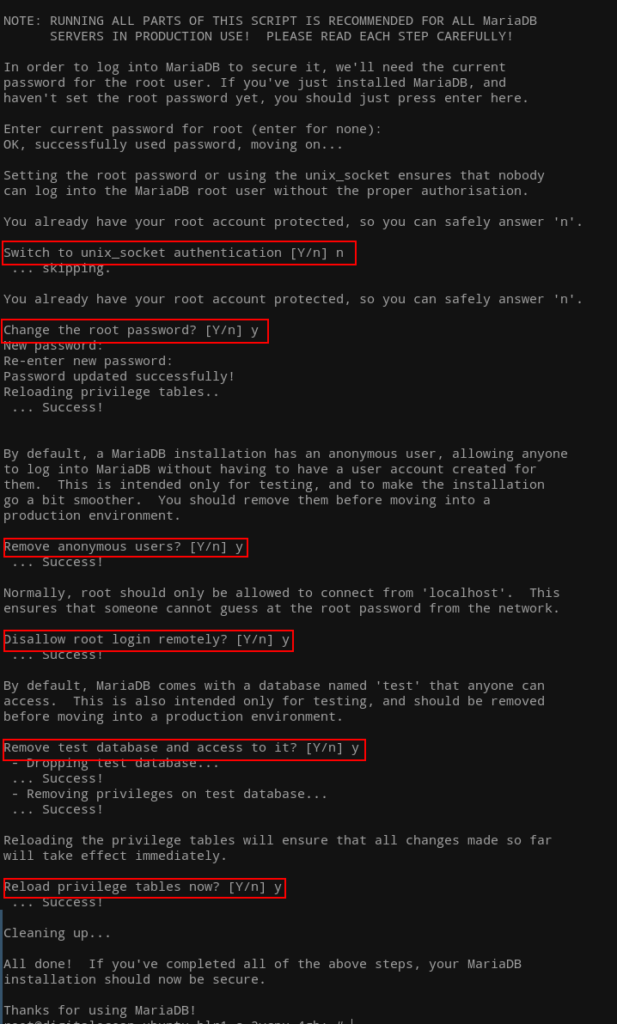
Use a strong PASSWORD.
mysql

create database redmine CHARACTER SET utf8mb4;

CREATE USER 'redmine'@'localhost' IDENTIFIED BY 'PASSWORD';
GRANT ALL PRIVILEGES ON redmine.* TO 'redmine'@'localhost';

flush privileges;
exit
4- Download Redmine
We will download Redmine, which is currently at version 5.0.6, at the time of writing this article.
cd /opt

wget https://www.redmine.org/releases/redmine-5.0.6.tar.gz

tar -xvzf redmine-5.0.6.tar.gz
mv redmine-5.0.6 redmine

rm redmine-5.0.6.tar.gz
5- Update database configuration
Next, we will update the database configuration file with the credentials and database we created above.
cd /opt/redmine
cp config/database.yml.example config/database.yml

vim config/database.yml
Update the production part as below:
production:
  adapter: mysql2
  database: redmine
  host: localhost
  username: redmine
  password: "PASSWORD"
  # Use "utf8" instead of "utfmb4" for MySQL prior to 5.7.7
  encoding: utf8mb4
Save the file.
6- Install dependencies and run scripts
We have set up the database, and now we will install Ruby dependencies in the project folder, including running Redmine scripts.
gem install bundler

bundle install
Run the Redmine scripts now:
bundle exec rake generate_secret_token

RAILS_ENV=production bundle exec rake db:migrate

RAILS_ENV=production bundle exec rake redmine:load_default_data
7- Create Apache host
cd /etc/apache2/sites-available/
vim redmine.conf
Copy and paste the following content into the configuration file. Change the domain name.
<VirtualHost *:80>
    ServerName DOMAIN.COM
    RailsEnv production
    DocumentRoot /opt/redmine/public

    <Directory "/opt/redmine/public">
            Allow from all
            Require all granted
            Options -Indexes +FollowSymLinks
    </Directory>

    ErrorLog ${APACHE_LOG_DIR}/redmine_error.log
</VirtualHost>
Enable this configuration:
a2dissite 000-default.conf
a2ensite redmine.conf

apachectl -t
systemctl restart apache2
Up until here, you should now have a running Redmine setup. If you want to have SSL in front of your Redmine setup, read on.
8- SSL
We will install Certbot via snap to get a free Let’s Encrypt SSL.
snap install certbot --classic
certbot certonly --webroot -w /opt/redmine/public -d DOAMIN.COM
Note: If you are experiencing issues with SSL, try changing the ownership of the Redmine project directory using the following command: chown -R www-data:www-data /opt/redmine/public.
And lastly, update the Redmine Apache configuration file as shown below:
<VirtualHost *:443>
	ServerName DOMAIN.COM
    RailsEnv production
    DocumentRoot /opt/redmine/public

	SSLCipherSuite EECDH+AESGCM:EDH+AESGCM:AES256+EECDH:ECDHE-RSA-AES128-SHA:DHE-RSA-AES128-GCM-SHA256:AES256+EDH:ECDHE-RSA-AES256-GCM-SHA384:ECDHE-RSA-AES128-GCM-SHA256:DHE-RSA-AES256-GCM-SHA384:ECDHE-RSA-AES256-SHA384:ECDHE-RSA-AES128-SHA256:ECDHE-RSA-AES256-SHA:DHE-RSA-AES256-SHA256:DHE-RSA-AES128-SHA256:DHE-RSA-AES256-SHA:DHE-RSA-AES128-SHA:ECDHE-RSA-DES-CBC3-SHA:EDH-RSA-DES-CBC3-SHA:AES256-GCM-SHA384:AES128-GCM-SHA256:AES256-SHA256:AES128-SHA256:AES256-SHA:AES128-SHA:DES-CBC3-SHA:HIGH:!aNULL:!eNULL:!EXPORT:!DES:!MD5:!PSK:!RC4
	SSLProtocol All -SSLv2 -SSLv3 -TLSv1 -TLSv1.1
	SSLHonorCipherOrder On
	Header always set Strict-Transport-Security "max-age=63072000; includeSubDomains; preload"
	Header always set X-Frame-Options DENY
	Header always set X-Content-Type-Options nosniff

	Protocols h2 http/1.1

	<Directory "/opt/redmine/public">
            Allow from all
            Require all granted
            Options -Indexes +FollowSymLinks
    </Directory>

	<FilesMatch ".(ico|pdf|flv|jpg|jpeg|png|gif|js|css|swf|ttf|woff)$">
		Header set Cache-Control "max-age=31536000, public"
	</FilesMatch>

	ErrorLog ${APACHE_LOG_DIR}/redmine_error.log

	SSLEngine on
	SSLCertificateKeyFile /etc/letsencrypt/live/DOMAIN.COM/privkey.pem
	SSLCertificateFile /etc/letsencrypt/live/DOMAIN.COM/fullchain.pem
</VirtualHost>
Restart Apache:
apachectl -t
systemctl restart apache2
You can now browse your installation with SSL.
To redirect HTTP traffic to HTTPS, add the following to port 80 section in /etc/apache2/sites-available/redmine.conf. Don’t forget to restart Apache afterwards.
RewriteEngine On
RewriteCond %{HTTPS} off
RewriteRule (.*) https://%{HTTP_HOST}%{REQUEST_URI}
If everything is in order, HTTP should now redirect to HTTPS.
The default login credentials are admin/admin.


