I have previously written about installing Mattermost with PostgreSQL on Ubuntu 22.04, but times change, and so do the apps and related components. In this article, I will guide you on how to install Mattermost with PostgreSQL on an Ubuntu 24.04 LTS server. So, keep reading!
Prepare the system
First, we will update the system and enable the firewall with the necessary ports.
apt update && apt upgrade

ufw default allow outgoing
ufw default deny incoming
ufw allow 22
ufw allow 80
ufw allow 443
ufw enable
ufw statusapt install apache2 curl certbotEnable the Apache modules and restart the service.
a2enmod ssl rewrite headers proxy proxy_http deflate cache proxy_wstunnel http2 proxy_fcgi env expires

systemctl restart apache2
systemctl enable apache2
Install PostgreSQL
Ubuntu 24.04 comes with PostgreSQL 16, which is what we need here.
apt install postgresqlAfter installation, configure it to start at boot time.
systemctl enable postgresqlWe will now create mattermost database and user in PostgreSQL. Replace PASSWORD with a strong password.
sudo -u postgres psql

CREATE DATABASE mattermost;
CREATE USER mmuser WITH PASSWORD 'PASSWORD';

GRANT ALL PRIVILEGES ON DATABASE mattermost to mmuser;
ALTER DATABASE mattermost OWNER TO mmuser;
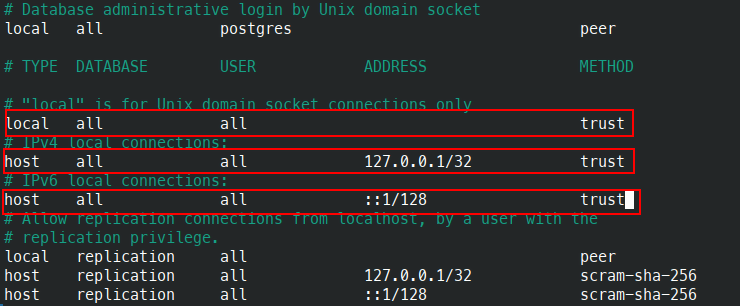
GRANT USAGE, CREATE ON SCHEMA PUBLIC TO mmuser;\qModify the file pg_hba.conf to allow the Mattermost server to communicate with the database by setting the host connection types to trust.
vim /etc/postgresql/16/main/pg_hba.confChange it to trust as shown in the image below.

Afterwards, reload the PostgreSQL service.
systemctl reload postgresqlTo confirm that the username can connect to the mattermost database, try the following command.
psql --dbname=mattermost --username=mmuser --passwordApache virtual host
Let’s create a virtual host for our domain.
cd /etc/apache2/sites-available
vim mattermost.conf
Copy and paste the following into it, and replace DOMAIN.COM with your actual domain.
<VirtualHost *:80>
	ServerName DOMAIN.COM
	DocumentRoot /var/www/html

	<Directory "/var/www/html">
		AllowOverride All
		Options -Indexes +FollowSymLinks
	</Directory>

	ErrorLog /var/log/apache2/mattermost_error.log
</VirtualHost>
Enable this configuration and restart Apache.
a2dissite 000-default.conf
a2ensite mattermost.conf

apachectl -t
systemctl restart apache2
SSL
We can now obtain an SSL certificate for our domain from Let’s Encrypt.
certbot certonly --webroot -w /var/www/html -d DOMAIN.COMInstall Mattermost
Download the latest version of Mattermost. Version 10.2 is the latest stable release at the time of writing this article.
cd ~
wget https://releases.mattermost.com/10.2.1/mattermost-10.2.1-linux-amd64.tar.gz
Extract the downloaded archive and move it to /opt.
tar -xvzf mattermost*.gz
mv mattermost /opt

mkdir /opt/mattermost/data
We will also create a system user for Mattermost.
useradd --system --user-group mattermost

chown -R mattermost:mattermost /opt/mattermost
chmod -R g+w /opt/mattermost
Let’s configure a few things before starting the Mattermost server.
cp /opt/mattermost/config/config.json /opt/mattermost/config/config.defaults.json

vim /opt/mattermost/config/config.json
Update SiteURL to the actual URL (line 3).
Change DataSource to the following (line 151):
postgres://mmuser:PASSWORD@localhost:5432/mattermost?sslmode=disable&connect_timeout=10Save and exit.
We will now create a systemd unit file to auto-start Mattermost.
vim /lib/systemd/system/mattermost.serviceAdd the following into it:
[Unit]
Description=Mattermost
After=network.target
After=postgresql.service
BindsTo=postgresql.service

[Service]
Type=notify
ExecStart=/opt/mattermost/bin/mattermost
TimeoutStartSec=3600
KillMode=mixed
Restart=always
RestartSec=10
WorkingDirectory=/opt/mattermost
User=mattermost
Group=mattermost
LimitNOFILE=49152

[Install]
WantedBy=multi-user.target
Reload the Systemd daemon.
systemctl daemon-reloadWe can start Mattermost now.
systemctl enable mattermost
systemctl start mattermost

systemctl status mattermost
Update virtual host for SSL
Add a new block for port 443 to the virtual host file for SSL.
vim /etc/apache2/sites-available/mattermost.confReplace DOMAIN.COM with your actual domain name.
<VirtualHost *:443>
	ServerName DOMAIN.COM

	ProxyPreserveHost On
	RequestHeader set "X-Forwarded-Proto" expr=%{REQUEST_SCHEME}
	RequestHeader set "X-Forwarded-SSL" expr=%{HTTPS}

	RewriteEngine On
	RewriteCond %{REQUEST_URI} /api/v[0-9]+/(users/)?websocket [NC,OR]
	RewriteCond %{HTTP:UPGRADE} ^WebSocket$ [NC,OR]
	RewriteCond %{HTTP:CONNECTION} ^Upgrade$ [NC]
	RewriteRule .* ws://127.0.0.1:8065%{REQUEST_URI} [P,QSA,L]

	<Location />
		Require all granted
		ProxyPass http://127.0.0.1:8065/
		ProxyPassReverse http://127.0.0.1:8065/
		ProxyPassReverseCookieDomain 127.0.0.1 DOMAIN.COM
	</Location>

	SSLCipherSuite EECDH+AESGCM:EDH+AESGCM:AES256+EECDH:ECDHE-RSA-AES128-SHA:DHE-RSA-AES128-GCM-SHA256:AES256+EDH:ECDHE-RSA-AES256-GCM-SHA384:ECDHE-RSA-AES128-GCM-SHA256:DHE-RSA-AES256-GCM-SHA384:ECDHE-RSA-AES256-SHA384:ECDHE-RSA-AES128-SHA256:ECDHE-RSA-AES256-SHA:DHE-RSA-AES256-SHA256:DHE-RSA-AES128-SHA256:DHE-RSA-AES256-SHA:DHE-RSA-AES128-SHA:ECDHE-RSA-DES-CBC3-SHA:EDH-RSA-DES-CBC3-SHA:AES256-GCM-SHA384:AES128-GCM-SHA256:AES256-SHA256:AES128-SHA256:AES256-SHA:AES128-SHA:DES-CBC3-SHA:HIGH:!aNULL:!eNULL:!EXPORT:!DES:!MD5:!PSK:!RC4
	SSLProtocol All -SSLv2 -SSLv3 -TLSv1 -TLSv1.1
	SSLHonorCipherOrder On
	Header always set Strict-Transport-Security "max-age=63072000; includeSubDomains; preload"
	Header always set X-Frame-Options DENY
	Header always set X-Content-Type-Options nosniff

    Protocols h2 http/1.1

    ErrorLog /var/log/apache2/mattermost_error.log

	SSLEngine on
	SSLCertificateKeyFile /etc/letsencrypt/live/DOMAIN.COM/privkey.pem
	SSLCertificateFile /etc/letsencrypt/live/DOMAIN.COM/fullchain.pem
</VirtualHost>
Save and restart Apache service.
apachectl -t
systemctl restart apache2
If everything is working as expected, you can redirect HTTP traffic to HTTPS. Add the following to the port 80 section.
RewriteEngine On
RewriteCond %{HTTPS} off
RewriteRule (.*) https://%{HTTP_HOST}%{REQUEST_URI}
You can now head over to the browser and start the initial setup by creating new account and team.


