There are two ways to install Nextcloud on TrueNAS, one is via the provided plugin and one is manually. I prefer the manual one, on which you have more control and updates would not break it. While the plugin version is easy to setup, it is also the most easy one to break with updates. In this article I am going to show how to create a pool/jail and install Nextcloud on TrueNAS CORE from ground up.
Without wasting your time and going to any details which no one want to read, let’s get started.
Note: This article is updated for 13.3-RELEASE with PHP 8.2 and other updates.
Create a pool
If you have already created a pool, skip this part.
Go to Pools and click on the Add button.

Type the pool name. Check the checkbox against the available disk and move it to the Data VDevs. Remember this is without RAID. Select the 2nd drive for RAID if you have 2. Both drives for the RAID has to be the same size.
Click Create to complete the process.

This pool is available now as dataset and can be attached to the jail or a jail can be created in it.
You have to set permissions on this dataset, go to users and create a user like www (default web user) and assign it to this pool/dataset. Read more here.
If in case you want to use a default pool for a jail, and then mount this newly created pool/dataset as data point for Nextcloud data. That is another way of doing it. For that, just click on the three dots menu and click Add dataset.
Change ownership of the mount point once inside the jail shell,
chown -R www:www /mnt/nc-data.
Create a jail
If you have already created a jail, skip this part.
A dataset must be created first to use jails. Select a pool from the gear icon where you want to create a jail.
Click on the Add button. Enter jail name, select Basejail as type, select the Release (choose the latest).
Check the VNET checkbox. If you want to have a static IP, enter the IP in IPv4 Address field, keep DHCP unchecked and keep the rest as is.
Set Auto Start checked.

Setup web server
Once the jail is created, click on the Shell for that jail and you will be dropped to the jail shell as root.
Let’s update and install Apache, MySQL and other basic packages.
pkg update
pkg upgrade

pkg install wget curl vim ffmpeg bzip2 zip unzip apache24 mysql80-server redis
Start the services and set them to auto start on boot.
service apache24 onestart
service mysql-server onestart
service redis onestart

sysrc apache24_enable=yes
sysrc mysql_enable=yes
sysrc redis_enable=yes
If you get the following warning:
AH00558: httpd: Could not reliably determine the server's fully qualified domain name, using 192.168.0.35. set the 'ServerName' directive gollbally to supress this message.Add this to httpd.conf at the end. If you don’t have static IP, just add 127.0.0.1.
vim /usr/local/etc/apache24/httpd.confServerName 192.168.0.35Also enable the following modules in httpd.conf.
expires_module
ssl_module
http2_module
proxy_module
session_module
dav_module
dav_fs_module
dav_lock_module
rewrite_module
ratelimit_module
Test and restart Apache.
apachectl -t
service apache24 restart
Install PHP and all the required PHP packages.
pkg install php82 php82-mysqli mod_php82 php82-gmp php82-bcmath php82-gd php82-curl php82-mbstring php82-intl php82-xml php82-zip php82-fileinfo php82-pecl-imagick php82-session php82-zlib php82-pdo php82-pdo_mysql php82-bz2 php82-ctype php82-dom php82-exif php82-filter php82-iconv php82-ldap php82-opcache php82-pecl-APCu php82-pecl-redis php82-posix php82-simplexml php82-xmlreader php82-xmlwriter php82-xsl php82-sysvsem php82-sodium php82-pecl-smbclientAfter installation to make Apache load PHP files, create or add 001_mod-php.conf in modules.d dir.
vim /usr/local/etc/apache24/modules.d/001_mod-php.confAdd the following in it and save.
<IfModule dir_module>
    DirectoryIndex index.php index.html
    <FilesMatch "\.php$">
        SetHandler application/x-httpd-php
    </FilesMatch>
    <FilesMatch "\.phps$">
        SetHandler application/x-httpd-php-source
    </FilesMatch>
</IfModule>
Configure PHP ini file.
cp /usr/local/etc/php.ini-production /usr/local/etc/php.inivim /usr/local/etc/php.iniChange the values of the following in php.ini or uncomment them.
max_execution_time = 180
memory_limit = 512M
post_max_size = 999M
upload_max_filesize = 999M

opcache.enable=1
opcache.enable_cli=1
opcache.memory_consumption=512
opcache.interned_strings_buffer=96
opcache.max_accelerated_files=10000
opcache.revalidate_freq=1
opcache.save_comments=1
Check the configuration and restart Apache.
apachectl -t
service apache24 restart
Let’s create a database nextcloud.
mysql -u root -p

create database nextcloud CHARACTER SET utf8mb4 COLLATE utf8mb4_general_ci;
CREATE USER 'ncuser'@'localhost' IDENTIFIED WITH mysql_native_password BY 'PASSWORD';
GRANT ALL ON *.* TO 'ncuser'@'localhost';

flush privileges;
exit
MySQL configuration file is /usr/local/etc/mysql/my.cnf.
Download and install Nextcloud
cd /usr/local/www

wget https://download.nextcloud.com/server/releases/latest.zip

unzip latest.zip

chown -R www:www nextcloud

mkdir /var/log/nextcloud
Create a nextcloud.conf virtual host file.
vim /usr/local/etc/apache24/Includes/nextcloud.conf<VirtualHost *:80>
ServerName 192.168.0.35
DocumentRoot /usr/local/www/nextcloud
<Directory "/usr/local/www/nextcloud">
AllowOverride All
Options -Indexes +FollowSymLinks
Require all granted
</Directory>
ErrorLog /var/log/nextcloud/error.log
</VirtualHost>apachectl -t
service apache24 restartCreate a cronjob as www user.
crontab -e -u www
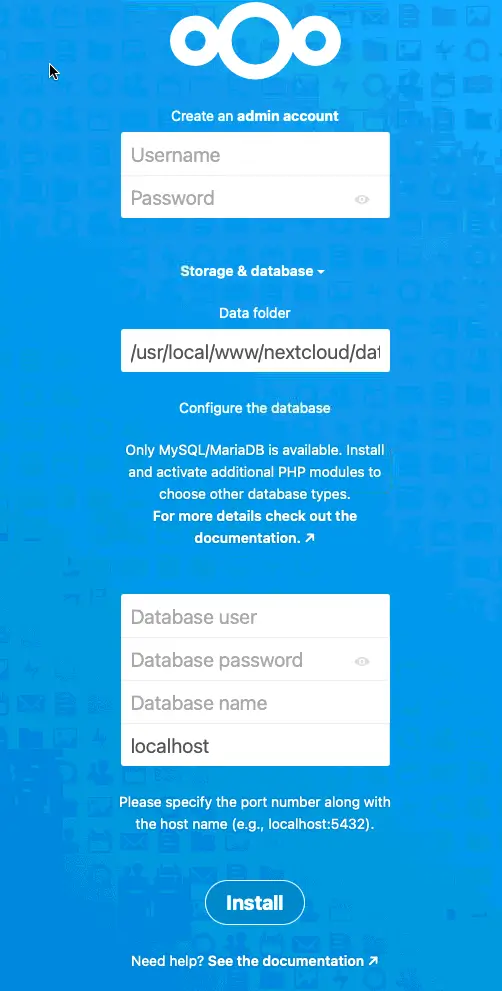
*/5 * * * * php -f /usr/local/www/nextcloud/cron.phpIt’s time to install Nextcloud. Hit the IP in the browser and start the installation process.
Get an SSL certificate for your Nextcloud on TrueNAS CORE. Click here
Data folder could be your mount point(/mnt/nc-data) or just the path as shown if you are using the pool as is.