I prefer and recommend installing the office tool for Nextcloud on a separate server (fresh) with specifications that cater to your needs. In this article, we will cover how to install OnlyOffice for collaborative document editing on Ubuntu 24.04 and integrate it with Nextcloud.
Before you start, point a domain or subdomain to the server’s IP address.
The minimum requirements for OnlyOffice to ensure better performance, suitable for a small team of 5 to 10 users, are:
- 2 CPU cores
- 4 GB of RAM or more
- 20 GB of free space
- 4 GB of swap
First, prepare your server by running the following commands:
apt update && apt upgrade

apt install apt-transport-https ca-certificates curl software-properties-common
Install docker
We will set up the Docker repository from docker.com.
First, let’s add the key.
install -m 0755 -d /etc/apt/keyrings

curl -fsSL https://download.docker.com/linux/ubuntu/gpg -o /etc/apt/keyrings/docker.asc

chmod a+r /etc/apt/keyrings/docker.asc
Now, we will add the repository.
echo \
  "deb [arch=$(dpkg --print-architecture) signed-by=/etc/apt/keyrings/docker.asc] https://download.docker.com/linux/ubuntu \
  $(. /etc/os-release && echo "$VERSION_CODENAME") stable" | \
  sudo tee /etc/apt/sources.list.d/docker.list > /dev/null
Update the packages and install docker-ce package.
apt update

apt install docker-ce
Apache virtual host and SSL
We will use Apache as a reverse proxy for the OnlyOffice Docker container.
apt install apache2

a2enmod ssl rewrite headers proxy proxy_http deflate cache proxy_wstunnel

systemctl enable apache2
systemctl start apache2

cd /etc/apache2/sites-available/
vim onlyoffice.conf
Change the DOMAIN.COM.
<VirtualHost *:80>
	ServerName DOMAIN.COM

	DocumentRoot /var/www/html

	<Directory "/var/www/html">
		AllowOverride All
		Options -Indexes +FollowSymLinks
	</Directory>

	ErrorLog /var/log/apache2/onlyoffice_error.log
</VirtualHost>
Enable this configuration and disable the default one.
a2ensite onlyoffice.conf
a2dissite 000-default.conf

systemctl restart apache2
Install certbot package.
apt install certbotNow let’s get a certificate for the domain.
certbot certonly --webroot -w /var/www/html -d DOMAIN.COMOnlyOffice docker container
We are now ready to start our Docker container.
docker run -i -t -d -p 127.0.0.1:9981:80 --restart=always \
    -e JWT_ENABLED=true \
    -e JWT_SECRET=3fhLSe156MUnvjhS4asfd435gys \
    -e JWT_HEADER=Authorization \
    -e JWT_IN_BODY=true \
    -v /app/onlyoffice/DocumentServer/data:/var/www/onlyoffice/Data onlyoffice/documentserver
You can change the JWT_SECRET to one of your choice.
After a few minutes, check if the container has started successfully.
docker psUpdate virtual host for SSL
Our Docker container is running, and we have the SSL certificate. We can now update the virtual host by adding the block for port 443 to proxy to the OnlyOffice container.
<VirtualHost *:443>

	ServerName DOMAIN.COM

	ErrorLog ${APACHE_LOG_DIR}/onlyoffice_error.log

	# SSL configuration
	SSLEngine on
	SSLCertificateFile /etc/letsencrypt/live/onlyoffice.lssuniversal.com/fullchain.pem
	SSLCertificateKeyFile /etc/letsencrypt/live/onlyoffice.lssuniversal.com/privkey.pem

	SSLProtocol all -SSLv2 -SSLv3
	SSLCipherSuite ECDHE-ECDSA-CHACHA20-POLY1305:ECDHE-RSA-CHACHA20-POLY1305:ECDHE-ECDSA-AES128-GCM-SHA256:ECDHE-RSA-AES128-GCM-SHA256:ECDHE-ECDSA-AES256-GCM-SHA384:ECDHE-RSA-AES256-GCM-SHA384:DHE-RSA-AES128-GCM-SHA256:DHE-RSA-AES256-GCM-SHA384:ECDHE-ECDSA-AES128-SHA256:ECDHE-RSA-AES128-SHA256:ECDHE-ECDSA-AES128-SHA:ECDHE-RSA-AES256-SHA384:ECDHE-RSA-AES128-SHA:ECDHE-ECDSA-AES256-SHA384:ECDHE-ECDSA-AES256-SHA:ECDHE-RSA-AES256-SHA:DHE-RSA-AES128-SHA256:DHE-RSA-AES128-SHA:DHE-RSA-AES256-SHA256:DHE-RSA-AES256-SHA:ECDHE-ECDSA-DES-CBC3-SHA:ECDHE-RSA-DES-CBC3-SHA:EDH-RSA-DES-CBC3-SHA:AES128-GCM-SHA256:AES256-GCM-SHA384:AES128-SHA256:AES256-SHA256:AES128-SHA:AES256-SHA:DES-CBC3-SHA:!DSS
	SSLHonorCipherOrder on
	SSLCompression off

	SetEnvIf Host "^(.*)$" THE_HOST=$1
	RequestHeader setifempty X-Forwarded-Proto https
	RequestHeader setifempty X-Forwarded-Host %{THE_HOST}e
	ProxyAddHeaders Off

	ProxyPassMatch (.*)(\/websocket)$ "ws://127.0.0.1:9981/$1$2"
	ProxyPass / "http://127.0.0.1:9981/"
	ProxyPassReverse / "http://127.0.0.1:9981/"

</VirtualHost>
Check the configuration and restart Apache.
apachectl -t
systemctl restart apache2
Integrate with Nextcloud
Log in to Nextcloud as an admin, go to Apps, search for OnlyOffice, and install the OnlyOffice app.

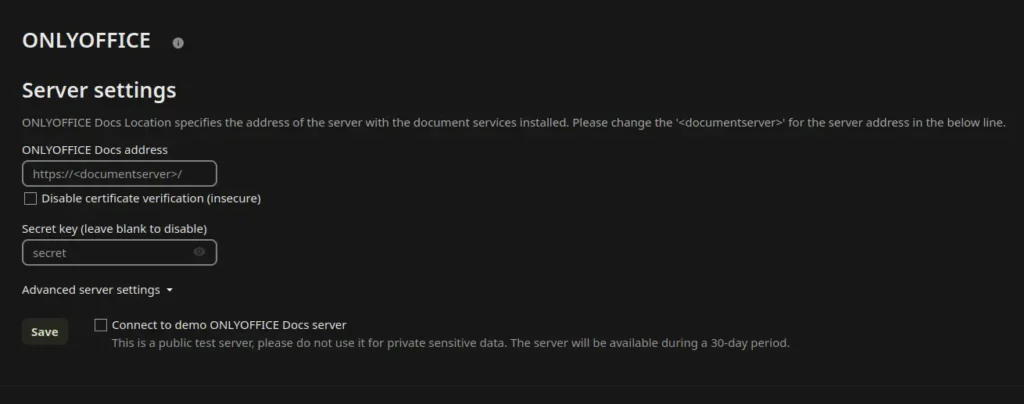
After that, go to Administration settings and click on OnlyOffice.

Here, simply enter the OnlyOffice URL and the JWT_SECRET in the secret field.
Once saved and connected successfully, you can adjust the settings for the office app as needed.


