Nextcloud 31, tagged as Hub 10, was released last month with many features, UI enhancements, and bug fixes. To me, this is one of the releases that heavily focuses on UI refinements. In this article, we discuss and walk through how to set up Nextcloud 31 (Hub 10) on an Ubuntu 24.04 LTS server with the Apache web server, PHP 8.3, and the MariaDB database.
If you have an older version of Nextcloud installed, you can go to the Admin settings and upgrade it to the version available.
We will cover the following in this article.
- Enable firewall with few ports
- Install LAMP stack (PHP-FPM, Apache, MariaDB)
- Redis for cache
- Get a free SSL certificate from Let’s Encrypt (point your domain to the server IP)
Enable firewall
Let’s the update the system before carrying out any task.
apt update && apt upgradeFor the basics, we only need ports 22, 80, and 443, so we will enable them with UFW.
ufw default allow outgoing
ufw default deny incoming
ufw allow 22
ufw allow 80
ufw allow 443
ufw enable
ufw statusInstall LAMP stack
Latest Nextcloud require at least PHP 8.2, Ubuntu 24.04 comes PHP 8.3.
apt install apache2 mariadb-server libapache2-mod-php php php-gmp php-bcmath php-gd php-json php-mysql php-cli php-curl php-mbstring php-intl php-imagick php-xml php-zip php-fpm php-redis php-apcu php-opcache php-ldap php-bz2 bzip2 zip unzip imagemagick vim ffmpeg redis-serverEnable PHP FPM along with some Apache modules:
a2enconf php8.3-fpm
a2dismod php8.3
a2dismod mpm_prefork
a2enmod mpm_event

a2enmod ssl rewrite headers proxy proxy_http deflate cache proxy_wstunnel http2 proxy_fcgi env expires
We will also enable PHP FPM, Apache and MariaDB services.
systemctl enable apache2
systemctl enable php8.3-fpm
systemctl enable mariadb
Configure PHP
Since we are using PHP FPM, we’ll update the FPM configuration file.
vim /etc/php/8.3/fpm/php.iniCheck PHP timezone manual for your timezone.
output_buffering = off (line 236)
max_execution_time = 180 (line 419)
memory_limit = 512M (line 445)
post_max_size = 1G (line 713)
upload_max_filesize = 1G (line 865)
date.timezone = Europe/Berlin (line 989)

opcache.enable=1 (line 1782)
opcache.enable_cli=1 (line 1785)
opcache.memory_consumption=512 (line 1788)
opcache.interned_strings_buffer=96 (line 1791)
opcache.max_accelerated_files=10000 (line 1795)
opcache.revalidate_freq=1 (line 1813)
opcache.save_comments=1 (line 1820)
Save and restart PHP FPM.
systemctl restart php8.3-fpmCreate database
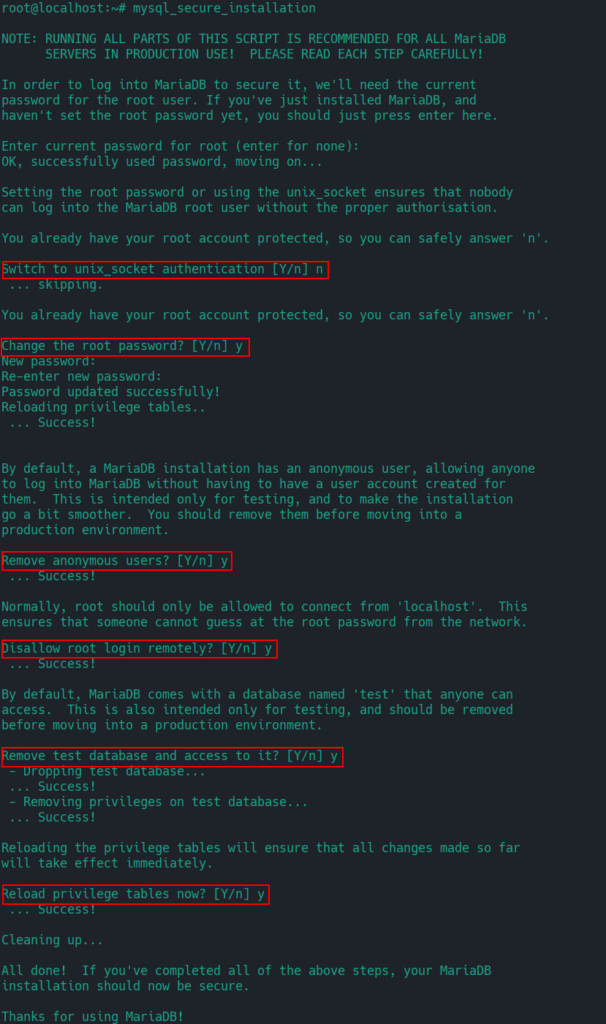
Run mysql_secure_installation to set up the initialization options for MariaDB startup.

Login to MariaDB to create Nextcloud database.
mysql

create database nextcloud CHARACTER SET utf8mb4 COLLATE utf8mb4_general_ci;

grant all on nextcloud.* to 'ncuser'@'localhost' identified by 'PASSWORD';

flush privileges;
exit
Download Nextcloud
cd /var/www
wget https://download.nextcloud.com/server/releases/nextcloud-31.0.0.zip
Unzip and move it to web server root directory.
unzip nextcloud-31.0.0.zip
rm /var/www/html/index.html
shopt -s dotglob
mv nextcloud/* html/
Create a data directory outside of the html directory.
mkdir /var/www/data

chown -R www-data:www-data /var/www/html
chown -R www-data:www-data /var/www/data
Remove the downloaded archive and extracted directory.
rm -r nextcloud
rm nextcloud-31.0.0.zip
Apache virtual host
cd /etc/apache2/sites-available/
vim nextcloud.conf
Add the following, and replace DOMAIN.COM with your own.
<VirtualHost *:80>
	ServerName DOMAIN.COM

	DocumentRoot /var/www/html

	<Directory "/var/www/html">
		AllowOverride All
		Options -Indexes +FollowSymLinks
	</Directory>

	ErrorLog /var/log/apache2/nextcloud_error.log
</VirtualHost>
Save and enable this configuration and restart Apache.
a2dissite 000-default.conf
a2ensite nextcloud.conf

apachectl -t
systemctl restart apache2
Get SSL certificate
apt install certbotReplace DOMAIN.COM with your own.
certbot certonly --webroot -w /var/www/html -d DOAMIN.COMTo enable automatic renewal, set up a cron job.
crontab -e30 4 * * * certbot renewUpdate virtual host
You have now SSL certificates ready to be used. Let’s update our Apache virtual host file.
vim /etc/apache2/sites-available/nextcloud.confDon’t forget to replace DOMAIN.COM and update the path to the certificate files.
<VirtualHost *:443>
	ServerName DOMAIN.COM

	DocumentRoot /var/www/html

	SSLCipherSuite EECDH+AESGCM:EDH+AESGCM:AES256+EECDH:ECDHE-RSA-AES128-SHA:DHE-RSA-AES128-GCM-SHA256:AES256+EDH:ECDHE-RSA-AES256-GCM-SHA384:ECDHE-RSA-AES128-GCM-SHA256:DHE-RSA-AES256-GCM-SHA384:ECDHE-RSA-AES256-SHA384:ECDHE-RSA-AES128-SHA256:ECDHE-RSA-AES256-SHA:DHE-RSA-AES256-SHA256:DHE-RSA-AES128-SHA256:DHE-RSA-AES256-SHA:DHE-RSA-AES128-SHA:ECDHE-RSA-DES-CBC3-SHA:EDH-RSA-DES-CBC3-SHA:AES256-GCM-SHA384:AES128-GCM-SHA256:AES256-SHA256:AES128-SHA256:AES256-SHA:AES128-SHA:DES-CBC3-SHA:HIGH:!aNULL:!eNULL:!EXPORT:!DES:!MD5:!PSK:!RC4
	SSLProtocol All -SSLv2 -SSLv3 -TLSv1 -TLSv1.1
	SSLHonorCipherOrder On

	Header always set Strict-Transport-Security "max-age=63072000; includeSubDomains; preload"
	Header always set X-Frame-Options "SAMEORIGIN"
	Header always set X-Content-Type-Options "nosniff"
	Header always set X-XSS-Protection "0"
	Header always set X-Permitted-Cross-Domain-Policies "none"
	Header always set Referrer-Policy "no-referrer-when-downgrade"
	Header always set Permissions-Policy "camera=(self), geolocation=(self), microphone=(self)"

	Protocols h2 http/1.1

	<Directory "/var/www/html">
		AllowOverride All
		Options -Indexes +FollowSymLinks
	</Directory>

	<FilesMatch ".(ico|pdf|flv|jpg|jpeg|png|gif|js|css|swf|ttf|woff)$">
		Header set Cache-Control "max-age=31536000, public"
	</FilesMatch>

	ErrorLog /var/log/apache2/nextcloud_error.log

	SSLEngine on
	SSLCertificateKeyFile /etc/letsencrypt/live/DOMAIN.COM/privkey.pem
	SSLCertificateFile /etc/letsencrypt/live/DOMAIN.COM/fullchain.pem
</VirtualHost>
Add redirection from HTTP to HTTPS in the port 80 block.
RewriteEngine On
RewriteCond %{HTTPS} off
RewriteRule (.*) https://%{HTTP_HOST}%{REQUEST_URI}
Save and restart Apache.
apachectl -t
systemctl restart apache2
Install Nextcloud
You can now browse to the domain name in your browser to get started.
- Enter your username
- Enter password for the user
- Enter data path (/var/www/data)
- Enter database credentials
Click Install after entering the above information.
On the next screen (Recommended apps), you can select which apps to install or skip it entirely.
Improvements
You can enhance your installation by setting up a cron job, adding caching to the configuration file, and more.


