
Nextcloud 28, tagged as Hub 7, is now available in the wild, boasting numerous features and improvements. If you have already installed Nextcloud, simply navigate to Administration and click the Upgrade button (availability may vary by region). For new installations, continue reading below for the step-by-step installation of Nextcloud 28 on Ubuntu Server (22.04 LTS).
Here is a quick summary of what’s new in Nextcloud 28 Hub 7.
- Unified Search – search anywhere within Nextcloud
- AI and Nextcloud Assistant
- Improved, fast and rewritten Files app
- Annotate PDF
- Customize navigation bar
- QR code generation in Office
- Share your notes
- Improved re-connection experience
- Mail – search in message body
- Deck – card cover images
- Talk – get personal with speaker video feed
- Talk – recording consent
- Talk – link to call in notifications
- Talk – file captions
The list is extensive. I would suggest checking out the release blog page for more details.
Without further ado, let’s dive in to begin the installation.
Want to install Nextcloud 29 (Hub 8) on the latest Ubuntu 24.04 server? Click here
Don’t forget to point your server IP to the domain of your choice.
1- Prepare the server
Update and upgrade your server:
apt update && apt upgradeEnable firewall and allow only specific ports.
ufw default allow outgoing
ufw default deny incoming
ufw allow 22
ufw allow 80
ufw allow 443
ufw enable
ufw status
We will now install the LAMP stack.
apt install apache2 mariadb-server libapache2-mod-php php php-gmp php-bcmath php-gd php-json php-mysql php-curl php-mbstring php-intl php-imagick php-xml php-zip php-fpm php-redis php-apcu php-opcache php-ldap php-bz2 bzip2 zip unzip imagemagick vim ffmpeg redis-serverAfter the installation has completed, enable PHP 8.1 FPM and its Apache configuration.
a2enconf php8.1-fpm
a2dismod php8.1
a2dismod mpm_prefork
a2enmod mpm_event
Run the following command to enable Apache modules.
a2enmod ssl rewrite headers proxy proxy_http deflate cache proxy_wstunnel http2 proxy_fcgi env expiresEnable Apache, MariaDB and PHP-FPM at boot time.
systemctl enable apache2
systemctl enable php8.1-fpm
systemctl enable mariadb
systemctl restart apache22- Create database
MariaDB comes with a database init script that is useful for tasks such as removing the test database and setting the root password.
mysql_secure_installation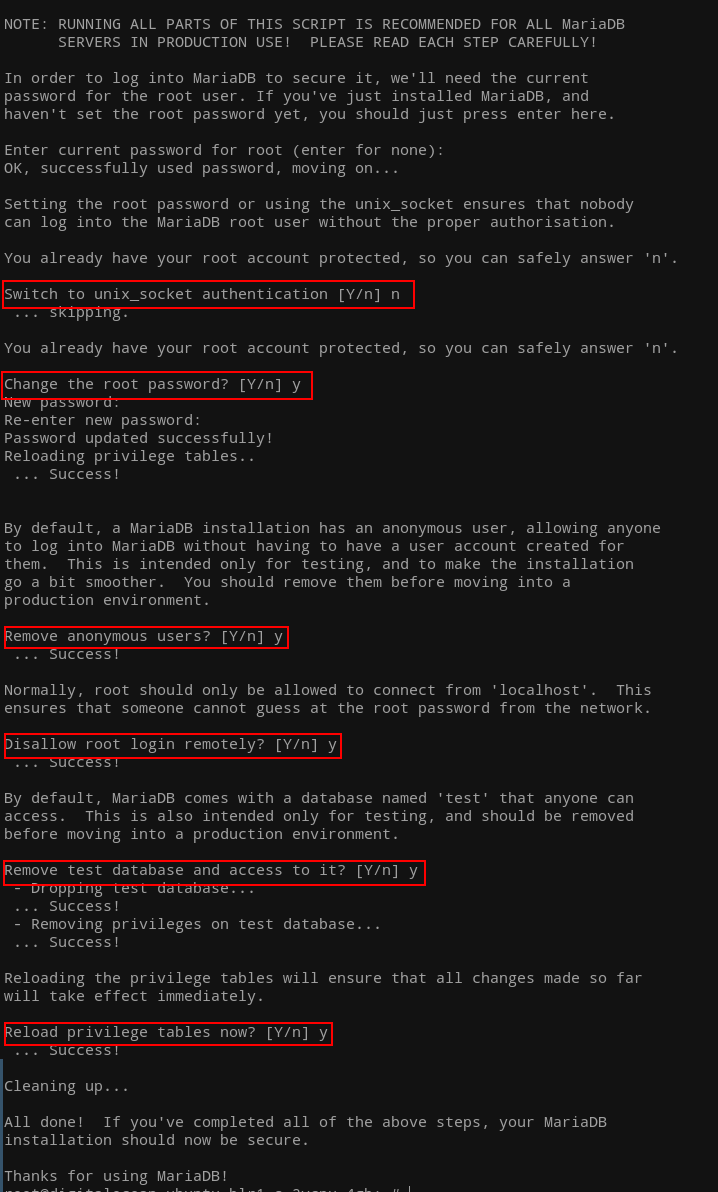
Login to the database now and create nextcloud database with a new user. Change PASSWORD to your own password in the command below.
mysql

create database nextcloud CHARACTER SET utf8mb4 COLLATE utf8mb4_general_ci;

grant all on nextcloud.* to 'ncuser'@'localhost' identified by 'PASSWORD';

flush privileges;
exit
3- Configure PHP
vim /etc/php/8.1/fpm/php.iniCheck PHP timezone manual for your timezone.
Update the following lines accordingly to match your setup.
Note: The line numbers provided are for informational purposes only.
output_buffering = off (line 226)
max_execution_time = 180 (line 409)
memory_limit = 512M (line 430)
post_max_size = 200M (line 698)
upload_max_filesize = 200M (line 850)
date.timezone = Europe/Berlin (line 968)

opcache.enable=1 (line 1767)
opcache.enable_cli=1 (line 1770)
opcache.memory_consumption=512 (line 1773)
opcache.interned_strings_buffer=96 (line 1776)
opcache.max_accelerated_files=10000 (line 1780)
opcache.revalidate_freq=1 (line 1798)
opcache.save_comments=1 (line 1805)
Save restart PHP-FPM afterwards.
systemctl restart php8.1-fpm4- Tune PHP FPM
We can adjust PHP FPM to handle heavy loads when necessary.
cd /etc/php/8.1/fpm/pool.d
vim www.conf
Locate the following parameters in the www.conf file and adjust them accordingly.
pm = dynamic
pm.max_children = 12
pm.start_servers = 6
pm.min_spare_servers = 4
pm.max_spare_servers = 8
pm.max_requests = 0
5- Download Nextcloud
Navigate to www directory.
cd /var/www
wget https://download.nextcloud.com/server/releases/nextcloud-28.0.5.zip
Unzip the archive and move it to the web root directory.
unzip nextcloud-28.0.5.zip
rm -r /var/www/html/*
shopt -s dotglob
mv nextcloud/* html/
chown -R www-data:www-data /var/www/html6- Virtual host
Create a nextcloud.conf file in sites-available.
cd /etc/apache2/sites-available/
vim nextcloud.conf
Paste the following into it and change DOMAIN.COM to your actual domain.
<VirtualHost *:80>
	ServerName DOMAIN.COM
	ServerAlias DOMAIN.COM
	DocumentRoot /var/www/html

	<Directory "/var/www/html">
		AllowOverride All
		Options -Indexes +FollowSymLinks
	</Directory>

	ErrorLog /var/log/apache2/nextcloud_error.log
</VirtualHost>
Activate this virtual host file.
a2dissite 000-default.conf
a2ensite nextcloud.conf

apachectl -t
systemctl restart apache2
7- Get SSL certificate
You have the option to either utilize your own certificate from another provider or leverage Let’s Encrypt.
apt install snapd
snap install certbot --classic
certbot certonly --webroot -w /var/www/html -d DOAMIN.COMNote down the certificate paths.
8- Update virtual host
Next, we will update the Apache configuration file for Nextcloud located at /etc/apache2/sites-available/nextcloud.conf. Add the following into it and make necessary changes, such as replacing DOMAIN.COM and updating the certificate paths.
<VirtualHost *:443>
	ServerName DOMAIN.COM
	DocumentRoot /var/www/html

	SSLCipherSuite EECDH+AESGCM:EDH+AESGCM:AES256+EECDH:ECDHE-RSA-AES128-SHA:DHE-RSA-AES128-GCM-SHA256:AES256+EDH:ECDHE-RSA-AES256-GCM-SHA384:ECDHE-RSA-AES128-GCM-SHA256:DHE-RSA-AES256-GCM-SHA384:ECDHE-RSA-AES256-SHA384:ECDHE-RSA-AES128-SHA256:ECDHE-RSA-AES256-SHA:DHE-RSA-AES256-SHA256:DHE-RSA-AES128-SHA256:DHE-RSA-AES256-SHA:DHE-RSA-AES128-SHA:ECDHE-RSA-DES-CBC3-SHA:EDH-RSA-DES-CBC3-SHA:AES256-GCM-SHA384:AES128-GCM-SHA256:AES256-SHA256:AES128-SHA256:AES256-SHA:AES128-SHA:DES-CBC3-SHA:HIGH:!aNULL:!eNULL:!EXPORT:!DES:!MD5:!PSK:!RC4
	SSLProtocol All -SSLv2 -SSLv3 -TLSv1 -TLSv1.1
	SSLHonorCipherOrder On

	Header always set Strict-Transport-Security "max-age=63072000; includeSubDomains; preload"
	Header always set X-Frame-Options "SAMEORIGIN"
	Header always set X-Content-Type-Options "nosniff"
	Header always set X-XSS-Protection "0"
	Header always set X-Permitted-Cross-Domain-Policies "none"
	Header always set Referrer-Policy "no-referrer-when-downgrade"
	Header always set Permissions-Policy "camera=(self), geolocation=(self), microphone=(self)"

	Protocols h2 http/1.1

	<Directory "/var/www/html">
		AllowOverride All
		Options -Indexes +FollowSymLinks
	</Directory>

	<FilesMatch ".(ico|pdf|flv|jpg|jpeg|png|gif|js|css|swf|ttf|woff)$">
		Header set Cache-Control "max-age=31536000, public"
	</FilesMatch>

	ErrorLog /var/log/apache2/nextcloud_error.log

	SSLEngine on
	SSLCertificateKeyFile /etc/letsencrypt/live/DOMAIN.COM/privkey.pem
	SSLCertificateFile /etc/letsencrypt/live/DOMAIN.COM/fullchain.pem
</VirtualHost>
Test the new configuration and restart Apache.
apachectl -t
systemctl restart apache2
Redirect to HTTPS automatically by adding the following to the port 80 block. Don’t forget to restart Apache for the changes to take effect.
RewriteEngine On
RewriteCond %{HTTPS} off
RewriteRule (.*) https://%{HTTP_HOST}%{REQUEST_URI}
9- Install Nextcloud
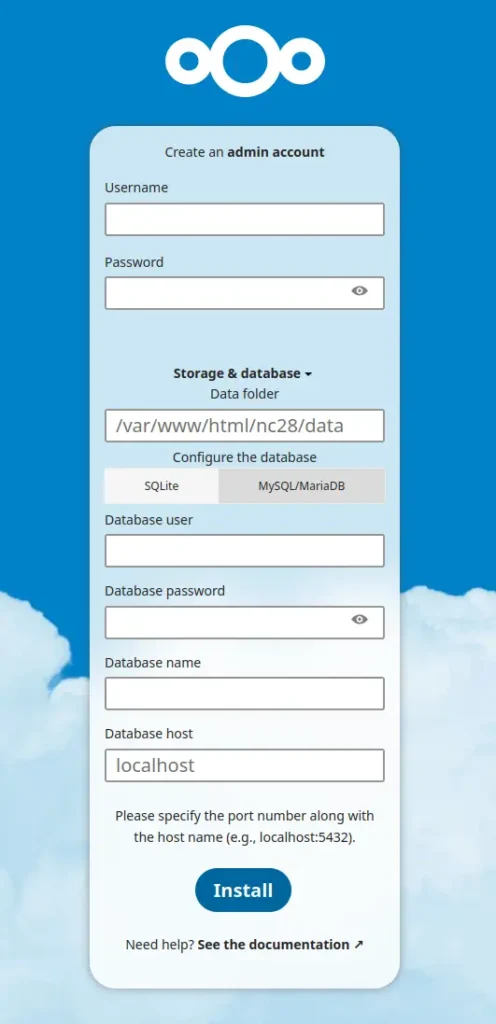
Once all the setup is complete, you can proceed to install Nextcloud. After entering your domain name in the browser, the installation page will appear. Enter all the necessary details and click Next. You have the option to install the recommended apps or simply skip that step on the next screen.
To enhance your Nextcloud experience, check out the improvements article.


give me please install nextcloud 28 in CentOs 7
CentOS 7 support is going to end soon. Instead you can use Rocky or Alma Linux. For those you can follow this how-to and apply the commands where necessary for Nextcloud 28.