
Rocket Chat is an open-source chat platform that provides a wide range of communication and collaboration tools for teams. It offers an easy-to-use interface, extensive customization options, and powerful features like voice and video calls, screen sharing, and file sharing. Installing Rocket Chat on your own server gives you full control over your data. In this article, I will guide you through the process of installing Rocket Chat with Apache proxy and SSL from Let’s encrypt for added security.
Server OS used is Ubuntu 22.04 LTS.
Need help with white labeling Rocket Chat Android app?
1- Update the system
We will update the system first.
apt update && apt upgradeapt autoremove && apt autocleanRestart the server if asked.
2- Install apps and libraries
We will be installing Rocket Chat via snap, for that we need to install snap package too.
apt install snap apache2 vimEnable Apache and some required modules.
systemctl enable apache2a2enmod ssl rewrite headers proxy proxy_http deflate cache proxy_wstunnel http2 proxy_fcgi env expiressystemctl restart apache23- Enable firewall
We will now enable UFW firewall and only allow few ports for communication.
ufw default allow outgoing
ufw default deny incoming
ufw allow 22
ufw allow 80
ufw allow 443
ufw enable
ufw status
Port 22 is the default port for ssh.
4- Install Rocket Chat
Let’s install Rocket Chat via snap.
snap install rocketchat-server5- Apache virtual host
Now we will create Apache virtual host for port 80 (http).
cd /etc/apache2/sites-available
vim rocketchat.conf
Paste or type the following in it.
Note: change where you see bold or camel words.
<VirtualHost *:80>
	ServerName DOMAIN.COM
	ServerAlias DOMAIN.COM
	DocumentRoot /var/www/html

	<Directory "/var/www/html">
		AllowOverride All
		Options -Indexes +FollowSymLinks
	</Directory>

	ErrorLog /var/log/apache2/rc_error.log
</VirtualHost>
Enable this configuration and restart Apache.
a2dissite 000-default.conf
a2ensite rocketchat.conf

apachectl -t
systemctl restart apache2
6- SSL certificate
For this to work, make sure your domain DNS is properly propagated. Otherwise no certificate will be issued by Let’s Encrypt.
snap install certbot --classic
certbot certonly --webroot -w /var/www/html -d DOMAIN.COM7- Update Apache virtual host
As we have our certificates ready, it’s time we update our virtual host file with 443 block and proxy for Rocket Chat.
<VirtualHost *:443>
	ServerName DOMAIN.COM

	SSLEngine on
	SSLCertificateFile /etc/letsencrypt/live/DOMAIN.COM/fullchain.pem
    SSLCertificateKeyFile /etc/letsencrypt/live/DOMAIN.COM/privkey.pem

	Protocols h2 http/1.1

	SSLCipherSuite EECDH+AESGCM:EDH+AESGCM:AES256+EECDH:ECDHE-RSA-AES128-SHA:DHE-RSA-AES128-GCM-SHA256:AES256+EDH:ECDHE-RSA-AES256-GCM-SHA384:ECDHE-RSA-AES128-GCM-SHA256:DHE-RSA-AES256-GCM-SHA384:ECDHE-RSA-AES256-SHA384:ECDHE-RSA-AES128-SHA256:ECDHE-RSA-AES256-SHA:DHE-RSA-AES256-SHA256:DHE-RSA-AES128-SHA256:DHE-RSA-AES256-SHA:DHE-RSA-AES128-SHA:ECDHE-RSA-DES-CBC3-SHA:EDH-RSA-DES-CBC3-SHA:AES256-GCM-SHA384:AES128-GCM-SHA256:AES256-SHA256:AES128-SHA256:AES256-SHA:AES128-SHA:DES-CBC3-SHA:HIGH:!aNULL:!eNULL:!EXPORT:!DES:!MD5:!PSK:!RC4
	SSLProtocol All -SSLv2 -SSLv3 -TLSv1 -TLSv1.1
	SSLHonorCipherOrder On
	Header always set Strict-Transport-Security "max-age=63072000; includeSubDomains; preload"
	Header always set X-Frame-Options DENY
	Header always set X-Content-Type-Options nosniff

	<Location />
		Require all granted
	</Location>

	ErrorLog /var/log/apache2/rc_error.log

	RewriteEngine On
	RewriteCond %{HTTP:CONNECTION} Upgrade [NC]
	RewriteCond %{HTTP:Upgrade} =websocket [NC]
	RewriteRule /(.*)           ws://localhost:3000/$1 [P,L]
	RewriteCond %{HTTP:Upgrade} !=websocket [NC]
	RewriteRule /(.*)           http://localhost:3000/$1 [P,L]

	ProxyPassReverse /          http://localhost:3000/
</VirtualHost>
Check the syntax and restart Apache.
apachectl -t
systemctl restart apache2
If everything is in order, you can redirect http to https in port 80 block now. Add the following to port 80 block in virtual host file.
RewriteEngine On
RewriteCond %{HTTPS} off
RewriteRule (.*) https://%{HTTP_HOST}%{REQUEST_URI}
Restart Apache afterwards.
8- Rocket Chat setup
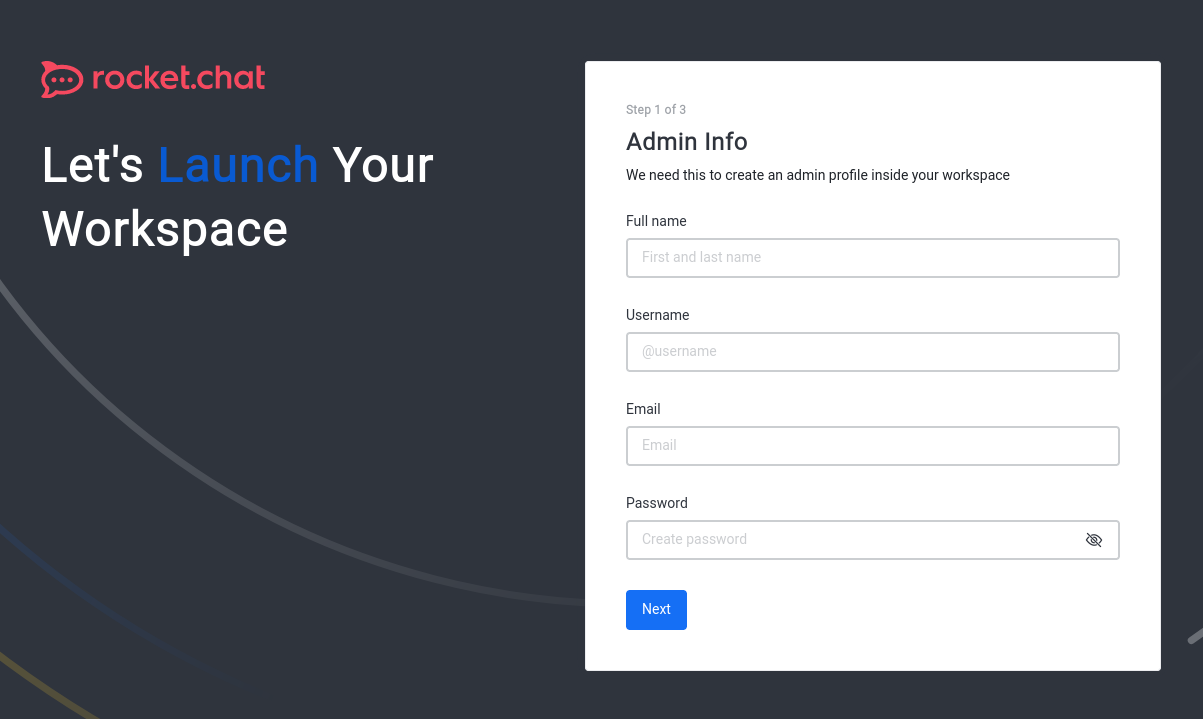
You can now browse to your domain, it will load Rocket Chat setup wizard. Enter all the necessary details.
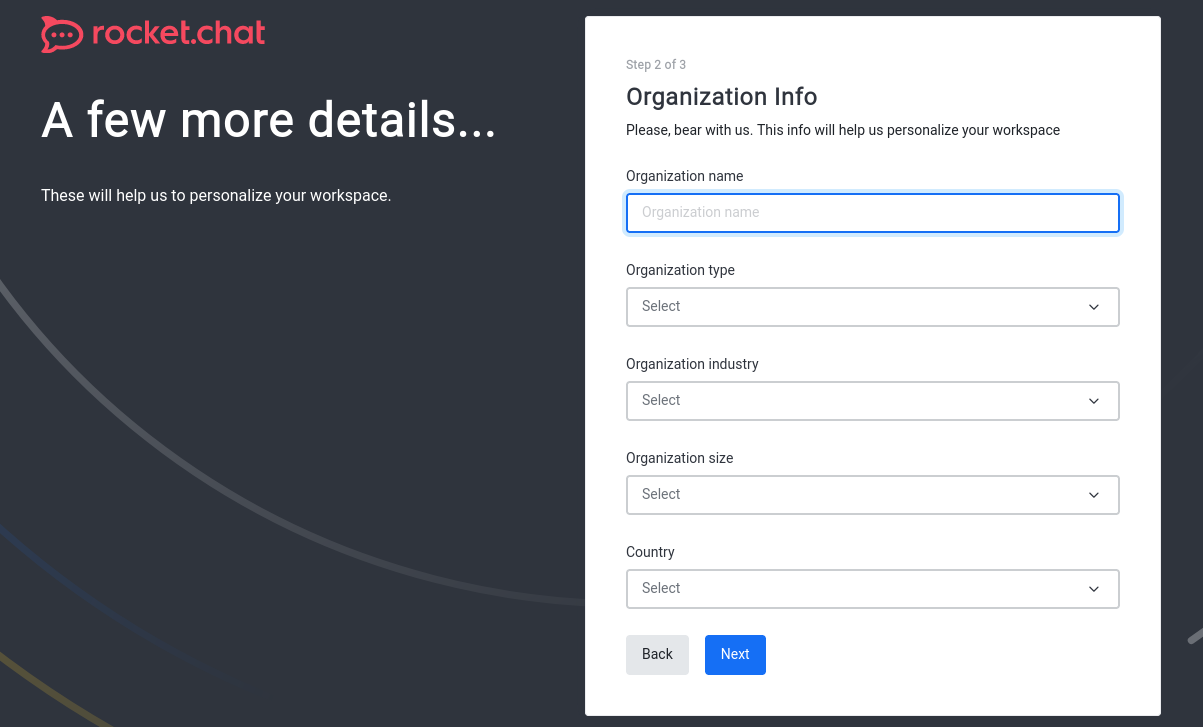
Enter your organization details, which will also be used in the next step (step 3) to register your server with Rocket Chat.
For the server registration part (step 3), if you want to use the Rocket Chat Android/iOS apps, you can register your server with Rocket Chat. This way you will get push notifications even though limited to some number per month.
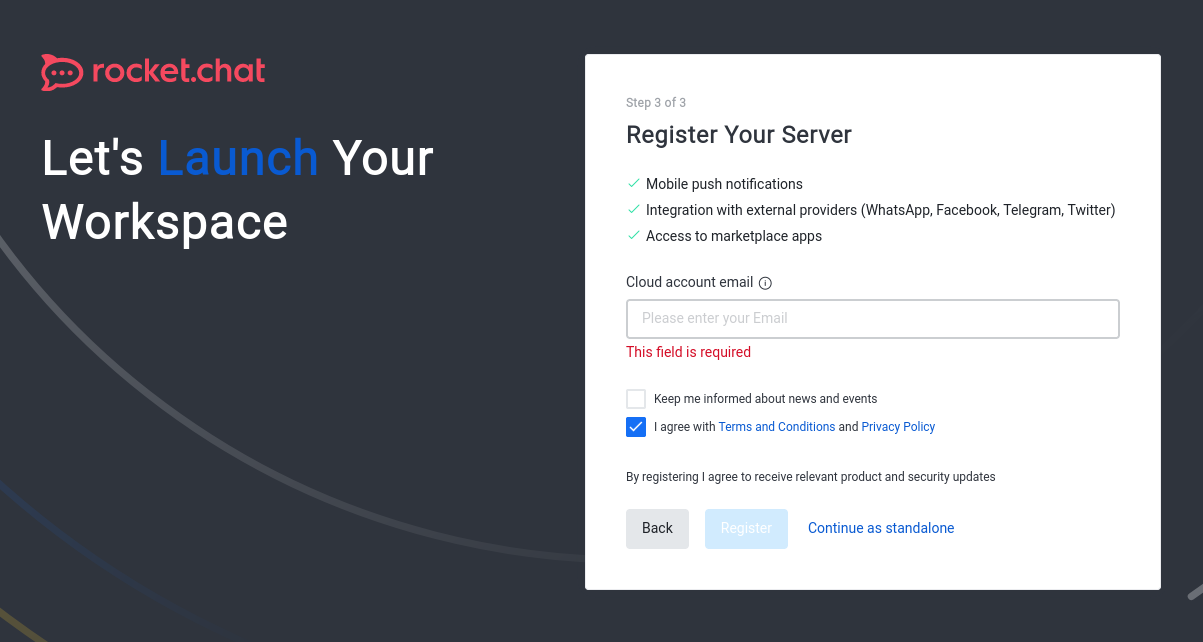
Note 1: Step 3 is optional and you can opt out by choosing Continue as standalone. You can still use the default apps, but with no push notifications etc.
Note 2: If for some reason the verification process does not work for the server registration. Complete the setup with Continue as standalone and then register your server from Administration -> Settings -> Setup wizard at later stage.
The installation is simple and straight forward. Once done, just go to Administration and change the name of the app, upload logo, favicon etc. All these can be found under Settings tab.
Tips
We installed Rocket Chat via snap, here are some extra commands if you need them. Check more here.
snap services rocketchat-server

snap get rocketchat-server

snap restart rocketchat-server

snap logs -f rocketchat-server


